Page Navigation Menu Widget for Blogger

Yesterday I wrote How to add Page Navigation Menu hack by editing your blogger template. Now today I would like to use a different method to add this Page Navigation Menu to our Blogger Blog. Most Bloggers will prefer this method to add Page navigation Menu , because this method is very easy than editing Blogger Template.

Let us see how to add this Page Navigation Menu Widget :

Page Navigation Menu Widget


step 1 : Login to your Blogger account and Navigate to Layout Section . Now click Add Page Element link there.
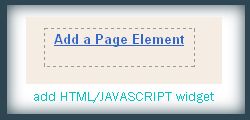


Step 2 : In that Page Element window , choose HTML / JAVASCRIPT .

Step 3 : Now add this Javascript in that window.


<style>
.showpageArea {padding: 0 2px;margin-top:10px;margin-bottom:10px;
}
.showpageArea a {border: 1px solid #505050;
color: #000000;font-weight:normal;
padding: 3px 6px !important;
padding: 1px 4px ;margin:0px 4px;
text-decoration: none;
}
.showpageArea a:hover {
font-size:11px;
border: 1px solid #333;
color: #000000;
background-color: #FFFFFF;
}

.showpageNum a {border: 1px solid #505050;
color: #000000;font-weight:normal;
padding: 3px 6px !important;
padding: 1px 4px ;margin:0px 4px;
text-decoration: none;

}
.showpageNum a:hover {
font-size:11px;
border: 1px solid #333;
color: #000000;
background-color: #FFFFFF;

}
.showpagePoint {font-size:11px;
padding: 2px 4px 2px 4px;
margin: 2px;
font-weight: bold;
border: 1px solid #333;
color: #fff;
background-color: #000000;


}

.showpage a:hover {font-size:11px;
border: 1px solid #333;
color: #000000;
background-color: #FFFFFF;

}
.showpageNum a:link,.showpage a:link {
font-size:11px;
padding: 2px 4px 2px 4px;
margin: 2px;
text-decoration: none;
border: 1px solid #0066cc;
color: #0066cc;
background-color: #FFFFFF;}

.showpageNum a:hover {font-size:11px;
border: 1px solid #333;
color: #000000;
background-color: #FFFFFF;
}
</style>


<script type="text/javascript">

function showpageCount(json) {
var thisUrl = location.href;
var htmlMap = new Array();
var isFirstPage = thisUrl.substring(thisUrl.length-14,thisUrl.length)==".blogspot.com/";
var isLablePage = thisUrl.indexOf("/search/label/")!=-1;
var isPage = thisUrl.indexOf("/search?updated")!=-1;
var thisLable = isLablePage ? thisUrl.substr(thisUrl.indexOf("/search/label/")+14,thisUrl.length) : "";
thisLable = thisLable.indexOf("?")!=-1 ? thisLable.substr(0,thisLable.indexOf("?")) : thisLable;
var thisNum = 1;
var postNum=1;
var itemCount = 0;
var fFlag = 0;
var eFlag = 0;
var html= '';
var upPageHtml ='';
var downPageHtml ='';


var pageCount=5;
var displayPageNum=3;
var firstPageWord = 'First';
var endPageWord = 'Last';
var upPageWord ='Previous';
var downPageWord ='Next';


var labelHtml = '<span class="showpageNum"><a href="/search/label/'+thisLable+'?&max-results='+pageCount+'">';

for(var i=0, post; post = json.feed.entry[i]; i++) {
var timestamp = post.published.$t.substr(0,10);
var title = post.title.$t;
if(isLablePage){
if(title!=''){
if(post.category){
for(var c=0, post_category; post_category = post.category[c]; c++) {
if(encodeURIComponent(post_category.term)==thisLable){
if(itemCount==0 (itemCount % pageCount ==(pageCount-1))){
if(thisUrl.indexOf(timestamp)!=-1 ){
thisNum = postNum;
}

postNum++;
htmlMap[htmlMap.length] = '/search/label/'+thisLable+'?updated-max='+timestamp+'T00%3A00%3A00%2B08%3A00&max-results='+pageCount;
}
}
}
}//end if(post.category){

itemCount++;
}

}else{
if(title!=''){
if(itemCount==0 (itemCount % pageCount ==(pageCount-1))){
if(thisUrl.indexOf(timestamp)!=-1 ){
thisNum = postNum;
}

if(title!='') postNum++;
htmlMap[htmlMap.length] = '/search?updated-max='+timestamp+'T00%3A00%3A00%2B08%3A00&max-results='+pageCount;
}
}
itemCount++;
}
}

for(var p =0;p< htmlMap.length;p++){
if(p>=(thisNum-displayPageNum-1) && p<(thisNum+displayPageNum)){
if(fFlag ==0 && p == thisNum-2){
if(thisNum==2){
if(isLablePage){
upPageHtml = labelHtml + upPageWord +'</a></span>';
}else{
upPageHtml = '<span class="showpage"><a href="/">'+ upPageWord +'</a></span>';
}
}else{
upPageHtml = '<span class="showpage"><a href="'+htmlMap[p]+'">'+ upPageWord +'</a></span>';
}

fFlag++;
}

if(p==(thisNum-1)){
html += '&nbsp;<span class="showpagePoint"><u>'+thisNum+'</u></span>';
}else{
if(p==0){
if(isLablePage){
html = labelHtml+'1</a></span>';
}else{
html += '<span class="showpageNum"><a href="/">1</a></span>';
}
}else{
html += '<span class="showpageNum"><a href="'+htmlMap[p]+'">'+ (p+1) +' </a></span>';
}
}

if(eFlag ==0 && p == thisNum){
downPageHtml = '<span class="showpage"> <a href="'+htmlMap[p]+'">'+ downPageWord +'</a></span>';
eFlag++;
}
}//end if(p>=(thisNum-displayPageNum-1) && p<(thisNum+displayPageNum)){
}//end for(var p =0;p< htmlMap.length;p++){

if(thisNum>1){
if(!isLablePage){
html = '<span class="showpage"><a href="/">'+ firstPageWord +' </a></span>'+upPageHtml+' '+html +' ';
}else{
html = ''+labelHtml + firstPageWord +' </a></span>'+upPageHtml+' '+html +' ';
}
}

html = '<div class="showpageArea"><span style="padding: 2px 4px 2px 4px;margin: 2px 2px 2px 2px;color: #000000;border: 1px solid #333; background-" class="showpage">Page '+thisNum+' of '+(postNum-1)+': </span>'+html;

if(thisNum<(postNum-1)){
html += downPageHtml;
html += '<span class="showpage"><a href="'+htmlMap[htmlMap.length-1]+'"> '+endPageWord+'</a></span>';
}

if(postNum==1) postNum++;
html += '</div>';

if(isPage isFirstPage isLablePage){
var pageArea = document.getElementsByName("pageArea");
var blogPager = document.getElementById("blog-pager");

if(postNum <= 2){
html ='';
}

for(var p =0;p< pageArea.length;p++){
pageArea[p].innerHTML = html;
}

if(pageArea&&pageArea.length>0){
html ='';
}

if(blogPager){
blogPager.innerHTML = html;
}
}

}
</script>

<script src="/feeds/posts/summary?alt=json-in-script&callback=showpageCount&max-results=99999" type="text/javascript"></script>
<div style="text-align:right;font-size:10px;color:000000;margin-top:15px;display:none;"> <a href="http://www.techieblogger.com/2008/07/page-navigation-hack-for-blogger.html">Grab this Widget ~ Blogger Accessories</a></div>

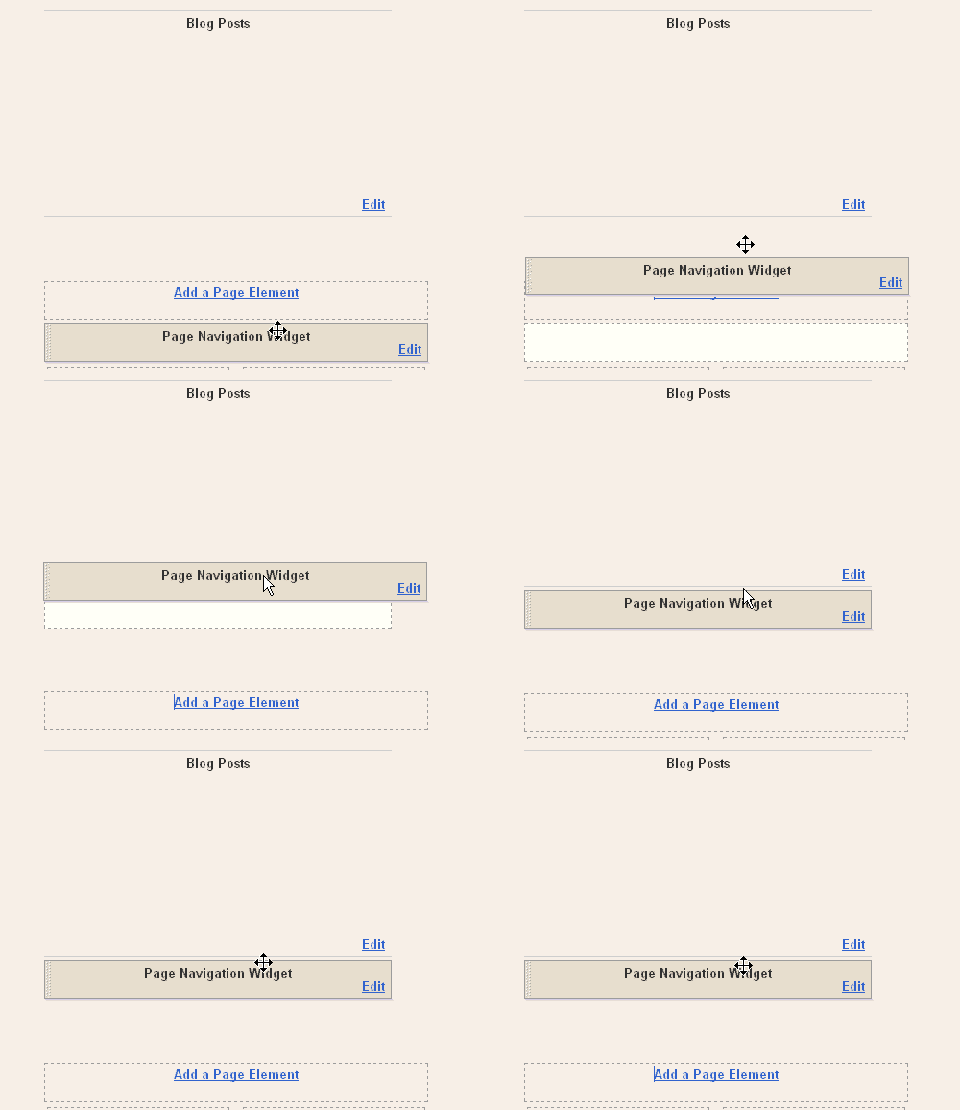
After Adding this Javascript you need to drag and drop the widget below the Blog Posts main widget. See this screen shot

Page Navigation Menu Widget


In the code above you can edit the lines in red to your wish .

1 : var pageCount = 5;

The digit in red represents number of posts to be shown in single page. Change the digit to show as many pages you want.

for example :

In my blog I have put that value as 2 . In each page you can see only 2 posts .


2 : var displayPageNum = 3;

here the digit in red represents number of pages to be listed.

For example :

In my blog I have chosen 3 , then 3 pages will be shown.

Now save your template .
That's it now we have added Page Navigation menu widget to our blog successfully .

I hope you guys will feel this method is easier than the last one.

Page Navigation Hack for Blogger

Most said page navigation menu in the bottom of the page can appear only in Wordpress blogs. But Now here is a blogger hack which will help you to show Page Navigation Menu in bottom of the page ( see screenshot ) . you can Add this Page Navigation hack to your blogger template either by inserting script to your template by editing or you can add it as a widget . In this post I will write only how to add this Page navigation menu by editing template code.

Page Navigation Hack


I have used a background image for this Page Navigation hack. If you want to show this without the background image just remove the background image url .

Let us start :

Step 1 : Log in to your blogger account and navigate to Layout section. Now go to the edit HTML subtab.

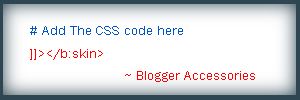
Step 2 : search this line ]]></b:skin> and add this CSS code above that line.


CSS CODE WITH IMAGE :


.showpageArea {padding: 0 2px;margin-bottom:10px;margin-top:10px;
}

.showpageArea a {border: 1px solid #505050;
color: #000000;font-weight:normal;
padding: 3px 6px !important;
padding: 1px 4px ;margin:0px 4px;
text-decoration: none;
}
.showpageArea a:hover {
font-size:11px;
border: 1px solid #333;
color: #000000;
background-color: #FFFFFF;
}

.showpageNum a {border: 1px solid #505050;
color: #000000;font-weight:normal;
padding: 3px 6px !important;
padding: 1px 4px ;margin:0px 4px;
text-decoration: none;

}
.showpageNum a:hover {
font-size:11px;
border: 1px solid #333;
color: #000000;
background-color: #FFFFFF;

}
.showpagePoint {font-size:11px;
padding: 2px 4px 2px 4px;
margin: 2px;
font-weight: bold;
border: 1px solid #333;
color: #fff;
background-color: #000000;


}

.showpage a:hover {font-size:11px;
border: 1px solid #333;
color: #000000;
background-color: #FFFFFF;

}
.showpageNum a:link,.showpage a:link {
font-size:11px;
padding: 2px 4px 2px 4px;
margin: 2px;
text-decoration: none;
border: 1px solid #0066cc;
color: #0066cc;
background-color: #FFFFFF;}

.showpageNum a:hover {font-size:11px;
border: 1px solid #333;
color: #000000;
background-color: #FFFFFF;
}


It must look like this :

 When you Add CSS code to your template , it must look like this


Step 3 : Now search for this code or related in your template ( no need to expand widgets )

<b:section class='main' id='main' showaddelement='yes'>
<b:widget id='Blog1' locked='true' title='Blog Posts' type='Blog'/>
</b:section>


Now Add This script just below the </b:section> .


&lt;script type=&quot;text/javascript&quot;&gt;

function showpageCount(json) {
var thisUrl = location.href;
var htmlMap = new Array();
var isFirstPage = thisUrl.substring(thisUrl.length-14,thisUrl.length)==&quot;.blogspot.com/&quot;;
var isLablePage = thisUrl.indexOf(&quot;/search/label/&quot;)!=-1;
var isPage = thisUrl.indexOf(&quot;/search?updated&quot;)!=-1;
var thisLable = isLablePage ? thisUrl.substr(thisUrl.indexOf(&quot;/search/label/&quot;)+14,thisUrl.length) : &quot;&quot;;
thisLable = thisLable.indexOf(&quot;?&quot;)!=-1 ? thisLable.substr(0,thisLable.indexOf(&quot;?&quot;)) : thisLable;
var thisNum = 1;
var postNum=1;
var itemCount = 0;
var fFlag = 0;
var eFlag = 0;
var html= &#39;&#39;;
var upPageHtml =&#39;&#39;;
var downPageHtml =&#39;&#39;;


var pageCount=5;
var displayPageNum=3;
var firstPageWord = &#39;First&#39;;
var endPageWord = &#39;Last&#39;;
var upPageWord =&#39;Previous&#39;;
var downPageWord =&#39;Next&#39;;


var labelHtml = &#39;&lt;span class=&quot;showpageNum&quot;&gt;&lt;a href=&quot;/search/label/&#39;+thisLable+&#39;?&amp;max-results=&#39;+pageCount+&#39;&quot;&gt;&#39;;

for(var i=0, post; post = json.feed.entry[i]; i++) {
var timestamp = post.published.$t.substr(0,10);
var title = post.title.$t;
if(isLablePage){
if(title!=&#39;&#39;){
if(post.category){
for(var c=0, post_category; post_category = post.category[c]; c++) {
if(encodeURIComponent(post_category.term)==thisLable){
if(itemCount==0 (itemCount % pageCount ==(pageCount-1))){
if(thisUrl.indexOf(timestamp)!=-1 ){
thisNum = postNum;
}

postNum++;
htmlMap[htmlMap.length] = &#39;/search/label/&#39;+thisLable+&#39;?updated-max=&#39;+timestamp+&#39;T00%3A00%3A00%2B08%3A00&amp;max-results=&#39;+pageCount;
}
}
}
}//end if(post.category){

itemCount++;
}

}else{
if(title!=&#39;&#39;){
if(itemCount==0 (itemCount % pageCount ==(pageCount-1))){
if(thisUrl.indexOf(timestamp)!=-1 ){
thisNum = postNum;
}

if(title!=&#39;&#39;) postNum++;
htmlMap[htmlMap.length] = &#39;/search?updated-max=&#39;+timestamp+&#39;T00%3A00%3A00%2B08%3A00&amp;max-results=&#39;+pageCount;
}
}
itemCount++;
}
}

for(var p =0;p&lt; htmlMap.length;p++){
if(p&gt;=(thisNum-displayPageNum-1) &amp;&amp; p&lt;(thisNum+displayPageNum)){
if(fFlag ==0 &amp;&amp; p == thisNum-2){
if(thisNum==2){
if(isLablePage){
upPageHtml = labelHtml + upPageWord +&#39;&lt;/a&gt;&lt;/span&gt;&#39;;
}else{
upPageHtml = &#39;&lt;span class=&quot;showpage&quot;&gt;&lt;a href=&quot;/&quot;&gt;&#39;+ upPageWord +&#39;&lt;/a&gt;&lt;/span&gt;&#39;;
}
}else{
upPageHtml = &#39;&lt;span class=&quot;showpage&quot;&gt;&lt;a href=&quot;&#39;+htmlMap[p]+&#39;&quot;&gt;&#39;+ upPageWord +&#39;&lt;/a&gt;&lt;/span&gt;&#39;;
}

fFlag++;
}

if(p==(thisNum-1)){
html += &#39;&amp;nbsp;&lt;span class=&quot;showpagePoint&quot;&gt;&lt;u&gt;&#39;+thisNum+&#39;&lt;/u&gt;&lt;/span&gt;&#39;;
}else{
if(p==0){
if(isLablePage){
html = labelHtml+&#39;1&lt;/a&gt;&lt;/span&gt;&#39;;
}else{
html += &#39;&lt;span class=&quot;showpageNum&quot;&gt;&lt;a href=&quot;/&quot;&gt;1&lt;/a&gt;&lt;/span&gt;&#39;;
}
}else{
html += &#39;&lt;span class=&quot;showpageNum&quot;&gt;&lt;a href=&quot;&#39;+htmlMap[p]+&#39;&quot;&gt;&#39;+ (p+1) +&#39; &lt;/a&gt;&lt;/span&gt;&#39;;
}
}

if(eFlag ==0 &amp;&amp; p == thisNum){
downPageHtml = &#39;&lt;span class=&quot;showpage&quot;&gt; &lt;a href=&quot;&#39;+htmlMap[p]+&#39;&quot;&gt;&#39;+ downPageWord +&#39;&lt;/a&gt;&lt;/span&gt;&#39;;
eFlag++;
}
}//end if(p&gt;=(thisNum-displayPageNum-1) &amp;&amp; p&lt;(thisNum+displayPageNum)){
}//end for(var p =0;p&lt; htmlMap.length;p++){

if(thisNum&gt;1){
if(!isLablePage){
html = &#39;&lt;span class=&quot;showpage&quot;&gt;&lt;a href=&quot;/&quot;&gt;&#39;+ firstPageWord +&#39; &lt;/a&gt;&lt;/span&gt;&#39;+upPageHtml+&#39; &#39;+html +&#39; &#39;;
}else{
html = &#39;&#39;+labelHtml + firstPageWord +&#39; &lt;/a&gt;&lt;/span&gt;&#39;+upPageHtml+&#39; &#39;+html +&#39; &#39;;
}
}

html = &#39;&lt;div class=&quot;showpageArea&quot;&gt;&lt;span style=&quot;font-size:11px;padding: 2px 4px 2px 4px;margin: 2px 2px 2px 2px;color: #000000;border: 1px solid #333; background-color: #FFFFFF;&quot; class=&quot;showpage&quot;&gt;Page &#39;+thisNum+&#39; of &#39;+(postNum-1)+&#39;: &lt;/span&gt;&#39;+html;

if(thisNum&lt;(postNum-1)){
html += downPageHtml;
html += &#39;&lt;span class=&quot;showpage&quot;&gt;&lt;a href=&quot;&#39;+htmlMap[htmlMap.length-1]+&#39;&quot;&gt; &#39;+endPageWord+&#39;&lt;/a&gt;&lt;/span&gt;&#39;;
}

if(postNum==1) postNum++;
html += &#39;&lt;/div&gt;&#39;;

if(isPage isFirstPage isLablePage){
var pageArea = document.getElementsByName(&quot;pageArea&quot;);
var blogPager = document.getElementById(&quot;blog-pager&quot;);

if(postNum &lt;= 2){
html =&#39;&#39;;
}

for(var p =0;p&lt; pageArea.length;p++){
pageArea[p].innerHTML = html;
}

if(pageArea&amp;&amp;pageArea.length&gt;0){
html =&#39;&#39;;
}

if(blogPager){
blogPager.innerHTML = html;
}
}

}
&lt;/script&gt;

&lt;script src=&quot;/feeds/posts/summary?alt=json-in-script&amp;callback=showpageCount&amp;max-results=99999&quot; type=&quot;text/javascript&quot;&gt;&lt;/script&gt;


<div style='text-align:right;font-size:10px;color:000000;margin-top:15px;display:none;'> <a href='http://www.techieblogger.com/2008/07/page-navigation-hack-for-blogger.html'>Grab this Widget ~ Techie Blogger</a></div>


In the code above you can edit the lines in red to your wish .

1 : var pageCount = 5;

The digit in red represents number of posts to be shown in single page. Change the digit to show as many pages you want.

for example :

In my blog I have put that value as 2 . In each page you can see only 2 posts .


2 : var displayPageNum = 3;

here the digit in red represents number of pages to be listed.

For example :

In my blog I have chosen 3 , then 3 pages will be shown.

That's it now we have added Page Navigation menu hack to our blog successfully .

That CSS code will suit almost all templates. Please don't remove the credit link.

I hope all of you will like this Page Navigation blogger hack . If you have any doubts please ask in comment section . Comments are most welcome , please give me your feedback about this blogger Hack.

You can also add this Page navigation hack in the another method : Widget style.

Colorful Link Hover Hack for Blogger

Today I have come with a really interesting and cool hack . This Hack is about changing Link Hover color with a simple Script. In all Blogs or website you can see only one Link Hover Color. But Here is cool javascript to add more colors to links. Here After I will add blogger hacks to my blog so that you guys can have an idea about that hack.


I Have added this Colorful Link Hover Blogger Hack to my Blog , you can check this hack by hovering your mouse cursor through links.

Colorful Link Hover Hack


In the Image above you can see that a single link is showing nearly 10 colors on Mouse Hover.

How to Add this Colorful Link Hover hack to my Blog ?

Its really very easy . Now Let us see how to add this Colorful Link Hover Hack in Blogger.

First login to your Blog and Navigate to Layout section . There click Edit HTML subtab .

Now search this following code </head> and add the below Javascript above the head section. If you Have any doubt please refer Image below .

<script src='http://rias.techno.wizard.googlepages.com/rainbow2.js'/>


ColorFull Link Hover - Blogger hack


That's it we have successfully Added colorful Link Hover Hack to Blogger celebrate.

Troubleshooting :

Sometime you may not see this hack because my Google page account bandwidth may be exceeded . Please upload the javascript to your own google page account.

Featured Post :

Tomorrow I am going to write about Adding Page Navigation Hack , don't forget to subscribe. Only few blogger blogs have this feature (Mine is also one among them sengihnampakgigi).

Thanks for reading , see you tomorrowbabai.

Add Search form to Blogger Beta Template

At first Adding search form to blogger was difficult but now Blogger Accessories has made it easier. We can add search form to blogger in three method . But in this post I am going to concentrate only on Adding custom search form . Custom search form means you can modify the search form look by adding simple CSS style.


  this is the screenshot of  Search Form Widget


Step 1 : Log in to your blogger template and go to Layout section .


 Adding search Form Widget to Blogger Beta : Layout Image
  

Step 2 : Now click Add Page Element , in the List select Add HTML / JAVASCRIPT  and paste the below code thereand save .


<form id="searchThis" action="/search" style="display:inline;" method="get"><input id="searchBox" name="q" type="text"/> <input id="searchButton" value="Go" type="submit"/></form>


Now see your blog , there you can see a beautiful search form widget like this ,


I hope you like this hack . you can also add custom search submit buttom , background , etc.


I will tell you How to add Custom CSS to this search Form tomorrow in my next post .

Navigation Menu or Drop Down Menu for Blogger

Here is an easy tutorial to add Navigation Menu or Drop Down Menu in Blogger. With this navigation Menu widget you can display most important links or categories in drop Down Menu format. This navigation Menu is very tiny and you can display as many links you want.

Let us see how to add this Navigation menu widget in Blogger :

Add navigation or drop down menu in blogger


Here is the Default code of Navigation menu :

<form><select name="menu" onchange="window.open(this.options[this.selectedIndex].value,'_blank')"size=1 name=menu>

<option value=0 selected> Type your Navigation Menu Title Here! </option>
<option value=" Url of your Link here "> Title of your link </option> </select></form>


in this above code , you need to edit the text in red to add links .

The text in green color is meant to open links in new window. If you want the links to be opened in same window then replace the text in green to this blank . ( that is delete _ )

if you want to add more links then add the last three lines in violet repeatedly as many times you want.

Look At My code below so that you can get an idea :


<form><select name="menu" onchange="window.open(this.options[this.selectedIndex].value,'_blank')"size=1 name=menu>

<option>- Blogger Accessories- </option>

<!-- change the links with your own -->

<option value="http://bloggeracs.blogspot.com/2008/07/jumong-three-column-blogger-template.html">Jumong Blogger Template</option>

<option value="http://bloggeracs.blogspot.com/2008/07/show-date-before-each-post-in-blogger.html">Show Date before each post</option>

<option value="http://bloggeracs.blogspot.com/2008/07/related-posts-widget-for-blogger.html">Related Posts Widget</option>

<option value="http://bloggeracs.blogspot.com/2008/07/hide-navigation-bar-in-blogger.html">Hide Navigation menu bar in blogger</option>

</select></form>


the result is :


How to Add this Navigation menu / Drop down Menu To my blog ?

It's very simple . First edit the code according to your wish and copy the code .

* Go to Layout section of your template .

* Click Add PageElement tab in sidebar

* Select HTML/JAVASCRIPT subtab

* Paste the Navigation Menu code you copied before there and save .

that's it now you can see a beautiful Navigation Menu in your blog.

See you soon with a new hack .

Free Blogger Templates

We are really proud to present you premium quality blogger templates for free here at Blogger Accessories . This is only the beginning We will upload more blogger templates soon. We will post atleast one blogger template per week .

License : All this templates comes under creative commons 3.0 License . According to creative commons 3.0 you should keep the footer credits.

Box Tube Template :


it's a two Column Blogger Template. This Template includes navigation bar , feedjit Widget , Social bookmarking sites widget , 3 column footer , related Posts hack , etc


--------------------------------------------------------------------------------------------------------
Jumong Blogger Template
:


Jumong is an exclusive Wordpress theme which I converted to Blogger recently . It's a three column widgerized Blogger Template.


more templates coming soon........

Jumong 3 column Blogger Template

jumong blogger template , 3 column blogger template,


Jumong theme is based on a popular Korean historical drama series. Initially I saw this template on a wordpress blog. It was a wordpress theme. I surfed search engines for a blogger version . But i came to know that jumong template is available only for wordpress,not for blogger . But I am really inspired by this template . So i decided to convert this wordpress jumong 3 column template to blogger beta template. This is my first template . It initially took lot of time , but finally i have converted this jumong wordpress template to blogger. And now I am testing this template on my own blog. I got no errors so far. And also it is tweaked for seo and also this template contains blogger hacks like ,

1. Related Articles

2. Swap Title for SEO

3. Label or Tag cloud

4. faster Loading

5. Meta Tag included , just replace the description and keywords with your own.

6. Bookmarking links for technorati , digg , del.icio.us , blink , etc

How to Add Adsense Ads below post title on blogger :

First check expand widgets template , The search for <div class='post-header-line-1'/> then add google adsense ad code immediately below that line .

How to show Google Adsense Ads only in post pages :

it's very simple , just add this code

<b:if cond='data:blog.pageType == &quot;item&quot;'>

put adsense ad code here

</b:if>

Do you want to show the related Posts widget in blogger :

Javascript needed for related posts widget is already added in the template itself , you just need to paste the following code in place you need the widget to appear ,

<script type='text/javascript'>
removeRelatedDuplicates();
printRelatedLabels();
</script>


If you want to add related posts widget below the post content in blogger , then in layout section check expand widgets . Search for <p><data:post.body/></p> , add the code below this line.

blogger demo : Blogger Plaza

This template is licensed under the Creative Commons Atribution License, so please do not remove the footer credits. I have worked hard to convert this wordpress theme to blogger.

Download Jumong Blogger template


How to change Blogger Template without deleting widgets ?

One of the Major Problem Blogger users have is whenever they try to change their templates , They will loss their widgets even if they take backup of their template. After Changing their template , they need to add widgets again manually. It's really annoying and time consuming process.

Is there any way to Backup our Widgets ?

yes . We can backup our widgets before changing our template.


How to backup Blogger Widgets ?

It's really simple guys , before changing template search your widgets code without putting check in expand widgets box.

Select the widget code as shown in the image below.


Now save the widget codes shown in between yellow box to notepad. Copy and Paste all your widget codes.

After doing this Upload your New Template . After uploading you will get a message like this


At This stage don't click Confirm & save tab. Rather search for the following code <b:widget id=' , Now paste the widget codes you have saved immediately above or below the code in yellow

After adding the widget codes save your template.
That's it ! Now you will have all widgets that you used in your previous blogger template.

How This works ?

Blogger will keep the widget content on their database with unique widget id.

I hope this hack will be very useful to you guys. Tell me your suggestions in our comment form , If you have any doubts ask there I will help you.

Add Icon Before Post Titles

Today I am going to tell how to add Icons to post titles. You would have noticed in some wordpress blogs like Dezzain and other famous blogs using Icons before the Post titles. Never Wonder how to do or Whether only Wordpress has this feature. It's really an easy hack and I will help you to implement this.


Let us start :

Step 1 :

First you need to create an image / Icon which you would like to show before each post title. You can create the image either in Photoshop or in Online Image creators. After creating the image upload it to blogger or any other image hosting sites like imageasck.us , photobucket , etc . Now copy and paste the image url in a text file.

Step 2 :

You need to create simple HTML code for your image like below ,

<img src=" your Image Url " />

change the text in red with your image url. Now we have successfully created the code for our image.

Step 3 :

Now let us see how to implement the image code in blogger Template. Login to your Blogger Account , then go to Layout subtab and then to EDIT HTML tab. Before we start first take a backup of your template . Put a check in expand widgets box and search for the code in red .

<b:if cond='data:post.url'>

<a expr:href='data:post.url'><data:post.title/></a>

If you want to show the image before post title , you need to add the image code after the red line.

If you want the image to appear after post title then paste the image code after the green text.

After doing this preview your template , Then save it.

I hope you would have liked this hack. If you have any problems in implementing this hack ask in comment form I will help you.

Tomorrow I will come with another nice Blogger Hack , If you don't want to miss it then subscribe to our RSS feed.

Embed Comment Form below post in Blogger

One of the problem blogger have is that Blogger don't have a embedded comment form like wordpress. After a longtime , now blogger draft has found a trick to include comment form. It's really an easy hack for those who use templates provided by blogger. For those who use customized template need to include a HTML code to make the comment form appear below each post.

Let see how to do this :

Step 1 : First login to draft.blogger.com with your google account . Then in blogger dashboard click settings then comments. There you will find three options like this

As shown above check comment form placement : Embedded below post.

Step 1 is enough for users who use uncustomized blogger template. For them after doing this the comment form will be included below the post. Other users need to do the second step to make the comment form appear below post.

Step 2 :

Now go to Edit HTML section and first take a backup copy of your template. Then check expand widgets and search the folowing code


<p class='comment-footer'> <b:if cond='data:post.allowComments'> <a expr:href='data:post.addCommentUrl' expr:onclick='data:post.addCommentOnclick'><data:postCommentMsg/></a> </b:if> </p>


Now replace the above code with this following code


<p class='comment-footer'> <b:if cond='data:post.embedCommentForm'> <b:include data='post' name='comment-form'/> <b:else/> <b:if cond='data:post.allowComments'> <a expr:href='data:post.addCommentUrl' expr:onclick='data:post.addCommentOnclick'><data:postCommentMsg/></a> </b:if> </b:if> </p>


that's it save your template. Now you can see a beautiful comment form embedded below each post.

Screenshot :


Troubleshooting :

Do this step only if the comment form don't appear after step 2. In some templates even after adding this code the comment form will not appear. Thanks to Blogger Buster for this hack . Now search for <b:include data='post' name='comments' /> and add the following code immediately below it <b:include data='post' name='comment-form'/> .

After adding this code all templates will have comment form embedded below post . It's really one of the best hack which draft blogger has now made it available for all blogger users. Before this most visitors might have felt uneasy to comment , because to write comments we need to navigate from the page or a pop-up window will open . But now writing comments is made very easy.

Anything else we can do with the comment form ?

Yes , we can change the width and height of comment form .

to change the width and height of comment form just change the following code in green .


<b:includable id='comment-form' var='post'>
<div class='comment-form'>
<a name='comment-form'/>
<h3><data:postCommentMsg/></h3>
<p><data:blogCommentMessage/></p>
<iframe allowtransparency='true' expr:src='data:post.commentFormIframeSrc' frameborder='0' height='275' id='comment-editor' scrolling='auto' width='100%'/>
</div>
</b:includable>


Why are you waiting for , write a comment on this post and let me know how much you liked this post .

Show Date before each Post in Blogger

You might have noticed in my template that there is a date widget before each post. Only a very few templates will have this. I hope to have a best and beautiful template we must concentrate in all minute things. So I decided to help my visitors to implement this hack in their template too. In this post I will give you the code what i have in my template , you guys can customize it to suit your template. If you have any doubts ask me in comment section .

Let' s start :


Go to settings then Formatting and change the date header format and other things similar to this you find in the image below


After doing this save your settings . Now navigate to edit HTML section and check exchange widgets , Then add the following CSS code in the CSS section of your template


#fecha {
display:block;
text-align: center;
float:left;height:70px;
font-family: Arial, Helvetica, sans-serif;
width:70px;
margin:0px 5px 0 0;
background:url(http://i263.photobucket.com/albums/ii150/mohamedrias/post-top_bg.png);
}

.fecha_dia {
display:block;
font-size:1.2em;
margin:0;
color:#336699;
font-weight: bold;
padding:0.7em 0 1.1em 0;
text-align: center;
}

.fecha_mes {
display:block;
font-size: 0.9em;
margin:0;
padding-top:5px;
color:#A10000;
font-weight: bold;
text-align:center;
}

.fecha_ano { display:none; visibility:hidden; height:0; }


.post-title, .post-title a {
margin-bottom:20px; padding:2px 0 0 0;
color:#00335B;text-decoration:none;
}
.post-title a hover {color:#00335B;text-decoration:none}
.post h2 {
font-family: Arial, Georgia, Sans-serif;
font-size: 18px;
margin-bottom:20px;
text-align:left;color:#00335B;
text-transform:uppercase;
}

.post-body {
font-family: Verdana, Arial, Georgia, Sans-serif;
font-size: 13px;margin-bottom:20px;margin-left:170px;
line-height: 1.3em;
margin: 3px 0 5px 0;
}


.post_header {
margin:0; padding:0;
height:90px;

}

.post_headerr {
margin-bottom:20px; padding:0;
}


.post-labels {
background:url(http://i263.photobucket.com/albums/ii150/mohamedrias/category-1.gif) no-repeat;
margin:0; padding:0 0 0 20px;
}

.details .post-comment-link {
background:url(http://i263.photobucket.com/albums/ii150/mohamedrias/comments-1.gif) no-repeat;
margin:0; padding:0 0 0 20px;
}


and now search for this following code <div class='post uncustomized-post-template'> or similar and then select the code below that line upto <div class='post-body'>
and replace that code with the following code


<div class='post_header'>
<div id='fecha'>
<script>remplaza_fecha(&#39;<data:post.timestamp/>&#39;);</script>
</div>

<div class='post_headerr'>

<a expr:name='data:post.id'/>
<b:if cond='data:post.title'>
<h2 class='post-title entry-title'>
<b:if cond='data:post.link'>
<a expr:href='data:post.link'><data:post.title/></a>
<b:else/>
<b:if cond='data:post.url'>
<a expr:href='data:post.url'><data:post.title/></a>
<b:else/>
<data:post.title/>
</b:if>
</b:if>
</h2>
</b:if>

<div class='details'>
<span class='post-labels'>
<b:if cond='data:post.labels'>
<data:postLabelsLabel/>
<b:loop values='data:post.labels' var='label'>
<a expr:href='data:label.url' rel='tag'><data:label.name/></a><b:if cond='data:label.isLast != &quot;true&quot;'>,</b:if><b:if cond='data:blog.pageType == &quot;item&quot;'>
<script expr:src='&quot;/feeds/posts/default/-/&quot; + data:label.name + &quot;?alt=json-in-script&amp;callback=related_results_labels&amp;max-results=10&quot;' type='text/javascript'/>
</b:if>
</b:loop>
</b:if>
</span> |
<span class='post-comment-link'>
<b:if cond='data:blog.pageType != &quot;item&quot;'>

<b:if cond='data:post.allowComments'>
<a class='comment-link' expr:href='data:post.addCommentUrl' expr:onclick='data:post.addCommentOnclick'><b:if cond='data:post.numComments == 1'>1 <data:top.commentLabel/><b:else/><data:post.numComments/> <data:top.commentLabelPlural/></b:if></a>
</b:if>
</b:if>
</span>

</div>
</div>
</div> <div class='post-header-line-1'/>


Now you can see date before each post.

Screenshot :


Anything else you can do with this ?

yes, In the CSS code you can see some codes are in red . You can change the codes in red to suit your template .

Write comments about this post and give me your suggestions .

Custom Search
Web Analytics