Showing posts with label Blogger Hack. Show all posts

Screen resolution CSS hack for web designers

Most of us might have noticed that our sites may look different in different screen resolutions. Though I have already posted one article on making website layout cross browser compatible , but its also necessary to make your site compatible for different screen resolutions. The visitors of your site will not have same screen resolution your are using. So it's mandatory to make your site compatible for different screen resolutions. For example, In lower screen resolutions like 800x600 px the website layout will be perfect. But when you look at your site at a higher screen resolution like 1024x768 px or even higher , the website header or sidebar may be aligned to either right or left. It's all because the designer might have designed the site for a particular screen resolution. In the screen resolution he was working , the site may look perfect. But when it comes to higher screen resolution , the theme may be misaligned.


what is the best screen resolution settings?


One can't design a website for a particular screen resolution, because visitors will have different screen resolutions. According to me , the best screen resolution on which the designer should be concentrating on should be higher than 1024px. For example if you take techieblogger's last month stats , most of my visitors are using higher screen resolution.

screen resolution compatibility

Some of the web designers use JavaScript to control the screen resolution compatibility. But it will reduce the site loading time.Instead of using JavaScript , I will explain how to make your site higher screen resolution compatible by making changes in CSS codes.


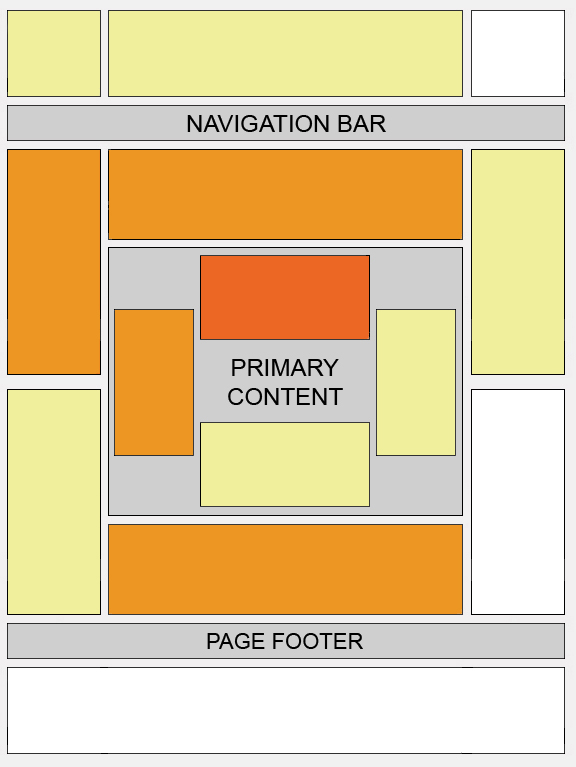
CSS controlling the alignment of the layout


Before explaining the original hack, first let me describe about the css code which controls the layout alignment.

margin: auto;

The simple margin tag in CSS controls the alignment of the site layout in different screen resolutions. I have selected auto to change the layout alignment in accordance with the visitors screen resolution.

Screen resolution compatible CSS - Blogger users

In order to make changes to your CSS code in blogger blogs , follow the below steps.

step 1 : First go to Layout section of your blog.
step2 : Then navigate to EDIT HTML page

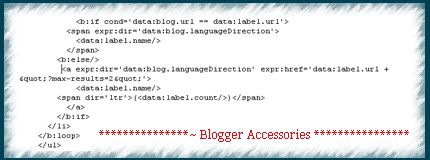
Now add the margin: auto; tag in the css codes of the following sections.
  • Header

  • Outer wrapper

  • content wrapper

  • wrapper

  • Footer


If one more sections are missing in your style sheet , then insert that code in the respective div sections used in your blogger template.


Screen resolution compatible CSS - Wordpress Users


To edit the css code in your wordpress blogs, follow the below steps.

first go to appearance option in your wordpress dashboard. Then go to EDITOR page. In that page , add the css code margin: auto; in the following css sections.

  • Header

  • Outer wrapper

  • content wrapper

  • wrapper

  • single entry

  • Footer


how to change screen resolution


For checking your site compatibility with different screen resolutions do any one of the below steps.

how to get a higher screen resolution on windows vista/XP


To change the screen resolution of your PC , do the following steps.Right click on your desktop , then click the option "Properties" there.A new window will open. Now navigate to "settings " tab. There you can see a slider to change the screen resolution. With that slider you can either increase or decrease. After you chose a particular screen resolution , click apply. It will give you a warning message click "ok".

properties window

Now open the browser and visit your site for compatibility.


how to set screen resolution using keyboard hotkey


You can also check the compatibility of your site with different screen resolutions with simple keyboard short keys.
First go to your blog and do the following :
To reduce the screen resolution , press "ctrl" and scroll down the mouse roller.
Or
press " ctrl " button and press "-" button.

To increase the screen resolution, click "ctrl" and "+" button or else press " ctrl " and scroll up the mouse roller.

With the above keyboards hotkeys , you can check the screen resolution compatibility of your site.


Hope this article will be useful for all web designers who want to create wordpress themes or blogger templates which are higher screen resolution compatible. If you have any problem with your website layout alignment, then please email me about the issue.

Show Adsense ads below post title

In this tutorial I will explain how to place Adsense ads below post title in Blogger Blogs with lots of customization tips. You might have noticed that most of the bloggers show Google adsense ads below title to increase their Click through rate and earnings.

According to Google adsense help pages " Where to place adsense ads ?". Placing adsense ads below title and above article content can bring high ctr and performance.

Adsense ads Below post title

This "heat map" illustrates the ideal placing on a sample page layout. The colors fade from dark orange (strongest performance) to light yellow (weakest performance). So it's clear from the heat map that the adsense ads below post title can bring high ctr.

How to add Adsense ads below post title ?

It's really very easy to add adsense ads below post title in blogger. Inorder to add adsense ads below post title ,just follow the below steps.

Before adding the adsense ads to blogger templates , we need to encode our adsense ads code.If you add the adsense code without encoding then you can't see any adsense ads below post title.

Encoding Adsense Ad Code ?

To encode adsense ads, first create an adsense ad and then visit centricle website to encode. In centricle web page , you need to paste your adsense code in the text area and then click " Encode ". Copy the encoded code. Now your adsense code is ready to be added to blogger template.

Adding adsense ad code to blogger template

step 1 : Go to layout section of your blogger template and then navigate to EDIT HTML sub tab. There check the "Expand Widget Templates ".

step2 : Look up the following tag : <p><data:post.body/></p> and paste the encoded adsense ad code above that tag.

Then click save. That's it Now we have added the adsense ad code below the post title in blogger blog successfully.

Customizing Adsense ads

Here are the few customization tips , which you can apply to increase your CTR.You might have seen that most of the bloggers will show more than Three posts in home page / labels page / archives page. But as per adsense TOS we can show only Three ads per page. So due to this we will see some blank spaces between post title and content , when the three adsense ads are already loaded.In order to avoid this error , we can show adsense ads only in Post pages i.e pages containing articles.

Showing adsense Ad only in Post pages

In order to implement this hack in your blogger template. you need to change the encoded adsense ad code to this.


<b:if cond='data:blog.pageType == &quot;item&quot;'>
Encoded Adsense code here
</b:if>


Now paste this code above <p><data:post.body/></p>

Making adsense ads to Float

After adding the adsense ad code to your templates , you can see that by default the adsense ad code will not allow any text to be shown nearby it.


So in order to overcome this error , we need to add some CSS codes to make adsense ad code to float either left or right.

For this we just need to modify the encoded adsense code to be added in step 2.

replace that encoded code with this one :

<div style="float:left;padding:5px;">

encoded adsense ad code here

</div>


Change the text in red to make adsense ad to float either to left or right.

My suggestion


According to me , instead of showing adsense ads in all pages ( home page , archives page and labels page ) , we can show adsense ads only in post pages to increase our ctr. If you are using the " Read More hack for Blogger with automatic Thumbnail creator script " then it's advisable to show adsense ads only in post pages.

Hope you guys will like this hack. If you need any more customization , then give me your suggestions via comments.

Read More hack for Blogger with automatic Thumbnail creator script

You might have noticed that since few weeks I have been using a strange script which enables us to summarize content and show only the summary with a thumbnail in Home Page , Archives page and Labels page.

Since some of my readers requested this hack in gtalk , so I am going to explain How to add this hack to your blogger template.


Before going into this , I would like to mention the previous versions of this created by some of my fellow Bloggers.


But these versions had some disadvantages like :

1. It can't automatically create summaries.


We need to add the following tag in all post pages while writing new posts

Type your summary here
<span id="fullpost">
Type rest of the post here
</span>


2. This feature can be available only for future posts.

That is if you already have 50 posts in your blog and then after that you are adding this hack to your template then you need to add the above tag in each and every previous 50 posts to make this hack working. But it's a tedious process.

3. Can't create Thumbnails automatically


This hack can't create automatic thumbnails for posts.

Now a new version has been developed by my blogger friends. I would like to share that new version of read more hack with you all.

Read More hack with automatic Thumbnail creator script


This hack has overcome all the drawbacks of the previous version of read more hack. This hack is developed by Blogsphera . ( Translated version ).

Let's see the installation instructions :

Adding the Javascript in the header

To add the javascript files to the header , first login to your blogger account. Then navigate to Layout section of your blog and then move to EDIT HTML sub tab.

There search for this tag : </head>

Now place the follwing code above that tag </head> :

<SCRIPT type='text/javascript'> var thumbnail_mode = &quot;no-float&quot; ; summary_noimg = 500; summary_img = 400; img_thumb_height = 130; img_thumb_width = 281; </SCRIPT> <SCRIPT src='http://www.smashingtips.com/wp-content/uploads/2009/05/read-more.js' type='text/javascript'/>


then save your template.

Final step : ADD the code in post body

Now check " Expand Widget Templates " option in the edit html page. And then search for this tag

<p><data:post.body/></p>


Now replace that whole tag with the code below :

<b:if cond='data:blog.pageType == &quot;item&quot;'>
<p><data:post.body/></p>
<b:else/><DIV expr:id='&quot;summary&quot; + data:post.id'><p><data:post.body/></p></DIV> <SCRIPT type='text/javascript'>createSummaryAndThumb(&quot;summary<data:post.id/>&quot;);</SCRIPT> <div style='clear: both;'/> <div style='border:0px;padding-top:5px;;float:right;text-align:right;'><span class='readon'><a expr:href='data:post.url' rel='bookmark'><img src='http://i422.photobucket.com/albums/pp302/bloggeracs/ReadMore.png'/></a></span></div>
</b:if>


You can now preview your template and then save it.

it will look like this :


Customizing The code

Now let us see how to customize the code to suit your style :

  • var thumbnail_mode = "no-float";
  • By default i have selected no-float. That the image will be unformatted. If you want the thumbnail to be shown only on left use the option " float " instead of "no-float".
  • summary_noimg = 500 ;
  • This code will decide how much characters must be shown in the post if that post doesn't contain any images. I have selected 500 characters.. you can customize it to suit ur template.
  • summary_img = 400 ;

  • If the post contains image , then this code will decide how many characters must be shown in that post. Change the number of characters to be shown to suit your template.
  • img_thumb_height = 130;
  • This tag decides the height of the thumbnail to be shown in the post. Vary the number 130 to suit your template.
  • img_thumb_width = 281 ;
  • This tag decides the width of the Thumbnail image to be shown.

    Adding read more image

    The author of this hack haven't included any read more buttons in this hack. But I have modified the code and have included a image to link to the full post.


    http://i422.photobucket.com/albums/pp302/bloggeracs/ReadMore.png

    If you want to change the image then replace the url of the image with your own image

    or if you don't need any read more button , then replace the code in final step to this one :

    <b:if cond='data:blog.pageType == "item"'>
    <p><data:post.body/></p>
    <b:else/><DIV expr:id='"summary" + data:post.id'><p><data:post.body/></p></DIV> <SCRIPT type='text/javascript'>createSummaryAndThumb("summary<data:post.id/>");</SCRIPT> <div style='clear: both;'/><div style='border:0px;padding-top:5px;;float:right;text-align:right;'><span class='readon'><a expr:href='data:post.url' rel='bookmark'>Read More...</a></span></div>
    </b:if>

    change the tag in red to suit your style.


Hope I have explained everything in this script. if you need any other modification or help please feel free to add to gtalk. I love to help you guys.

Create Compatible CSS for Firefox , IE6 , Opera , IE7 , etc

Learn How to create Compatible CSS for Various Browsers like Internet Explorer 6 , IE7 , IE8 , Opera , Firefox , etc..

Web-designers create blogger template for Hours using one particular browser say Firefox , They don't know that the CSS code they use is compatible only for the browser they are working at present. Especially in IE6 , there are many Compatible issues.

for Example : the sidebar may appear below main content wrapper or there would be more gap between each widget , content wrapper and sidebar may overlap ,etc.

So in this Post I will tell you How to create CSS code which is compatible for almost all browsers. For this you need to have two browsers Internet Explorer 6 and Firefox .


I have chose IE6 because it is one of the most common browsers which windows have.

Incompatibility issues in IE6 and Firefox

First let's check is our current Blogger template is compatible with all browsers or not.

For this visit this website : Browser Screen shots
Enter your Blog URL and check the images there to know How your blog looks in various Browsers.

step 2 : If you find any incompatibility issues then you need to modify your CSS code to suit browsers.

Let's us see an Example


Generally the css we use if of this form :

#example {
float : left;
width : 170px;
margin-left : 5px;
}


In this assume that this particular div is incompatible with Internet Explorer version x.

then we need to modify the above css code as

#example {
float : left;
width : 170px;
margin-left : 5px;
}
#example {
float : left;
width : 185px;
margin-left : 3px;
}

in this first css code is for all versions of Internet Explorer and the second css code is for other browsers like firefox , opera , dillo , sea monkey , etc

but it will be confusing for you to edit.. so now we are going to add different CSS rules to IE, we can use the child selector command which IE can't understand. The child selector command involves two elements, one of which is the child of the other. So, html>body refers to the child, body, contained within the parent, html.

After introducing Child selector command , the css code must look like this

#example {
float : left;
width : 170px;
margin-left : 5px;
}
html > body #example {
width : 185px;
margin-left : 3px;
}

in this the green colored code is for IE versions and the red Colored code is for other browsers.

So with simple child selector command we can make our css code compatible for all browsers. Every time when I create a New template , I use to check whether it is compatible with other browsers or not. And I use to change the CSS code to suit that browser.

If you are unable to modify the CSS code then please mail me your template and explain the problem , I will rectify those errors and mail you back.

Add 125 x 125 ad section to Blogger

Learn How to add an extra B:section in your Blog template and also learn to add 125x125 ad banners !

I noticed that most of my readers are asking me How to add 125 x 125 ads section in Blogger templates. We know that to add a widget we need b:section with add page elements function enabled. So in this post I will tell you how to add b:section in your Blogger template and how to add CSS code to suit that b:section.


So with this hack you can add any widget you want. And I will also make a note on Adding 125 x 125 Page Element.

Lets start :

Adding b:section to Blog sidebar :

Step 1 : Sign in to Your Blogger account and got to Layout section of your Blog. Then Navigate to Edit HTML sub tab.


Step 2 : If your template possess two Columns in Right sidebar and if you want to add an Subscription form or 125 x 125 ad section above those two columns then do this step.


 If you have a sidebar like this then add a b:section above the 2 columns to add more widgets


Search this tag or similar


<div id='sidebar-right'> <b:section class='sidebar-right' id='sidebar-right' preferred='yes'>

The id can be different , so please paste the following code just above the sidebar section of your Blog.


<div id='sidebar2'>
<b:section class='sidebar2' id='sidebar2' preferred='yes'>
</b:section></div>


So Now we have added the b:section code needed to add more widgets. Then we need to add css code for that b:section


#sidebar2 {
float : right;
margin-left:4px; width : 415px; background:#ffffff;
font : 11px Verdana;
}
#sidebar2 .widget {
list-style-type : none;
margin : 5px 0 5px 0;
padding : 0;
}

#sidebar2 .widget h2, #sidebar2 h2 {padding-left: 10px;
text-align:center;padding-left: 18px;
font: 12px/34px "Georgia", Verdana;
text-transform: uppercase;
color: #ffffff;
background: url("http://i263.photobucket.com/albums/ii150/mohamedrias/sidebar_title-2.gif") repeat;font-weight:bold;

}

#sidebar2 a {
color: #969696;
font-size : 12px;
text-decoration : none;
}
#sidebar2 a:hover {
color: #969696;
text-decoration : none;
}
#sidebar2 ul {
border : medium none;
margin : 7px;
padding : 0;
}
#sidebar2 ul li {
list-style-type : none;
border-bottom : 1px dotted #87581f;
margin : 0;
background-position : 0% 100%;
padding-left : 8px;
padding-right : 10px;
line-height : 15px;
padding-top : 5px;
padding-bottom : 5px;
}
#sidebar2 ul li a {
text-decoration: none; background: url(http://i263.photobucket.com/albums/ii150/mohamedrias/side_li_bullet.gif) no-repeat; padding:0 0 0 12px;color: #87581f;
}


please edit the text in green to suit your Blogger template.

So we have successfully added the b:section and css codings required.

Now navigate to Layout section of your blog and there you will see a new " Add page Elements " link just above the sidebar.

If you are planning to add 125 x 125 ad section then click add page element link. there select add HTML/ JAVASCRIPT page widget and insert the below code over there.


<div class="sidebar-ads">
<div class="sidebar-banner"><a href="#">
<img border="0" src="http://i263.photobucket.com/albums/ii150/mohamedrias/banner_125x125.jpg "/></a></div>

<div class="sidebar-banner"><a style="text-decoration: none;" href="#"><img border="0" src="http://i263.photobucket.com/albums/ii150/mohamedrias/banner_125x125.jpg" /></a></div>

<div class="sidebar-banner"><a style="text-decoration: none;" href="#"><img border="0" src="http://i263.photobucket.com/albums/ii150/mohamedrias/banner_125x125.jpg" /></a></div>

<div class="clear"></div><p><a href="mailto:your email id" title="Advertise Here">Advertise Here</a></p>
</div>


After adding the code , click save widget. Then navigate to Edit HTML sub tab to add the necessary CSS code needed for this ad section


/* Sidebar - Ads */

.sidebar-ads {
float: left;
width: 410px;margin-left:5px;
margin-bottom: 5px;
}

.sidebar-banner {
padding: 5px;
float: left;
}


#sidebar2 p { background:url(http://i263.photobucket.com/albums/ii150/mohamedrias/adsdotdot-1.gif) no-repeat center left; margin-top:5px;text-align:right;padding-right:10px;}


Edit the test in red to suit your template.


 After adding the CSS code this is how it will look

So we have successfully added the 125 x 125 ad section.


Adding b:section below or above posts ( content)


Most wish to add two column b:section below main container ( posts ) . I will write about this hack soon. (Its a continuation of this hack )

If you guys need any help , please feel free to contact me mohamedrias1103@gmail.com . See you soon with new Blogger hacks.

Show Labels containing specific number of Posts

I have already written " How to show only specific number of posts on Labels Page ". Today I am going to tell How to Show Only Labels with specific number of posts. This hack is very useful for those who have plenty of Labels in their Blog. It's a very simple hack , just follow the below steps to implement this hack in your blog.


Step 1 : Login to your Blogger Account and go to Layout section of your Blog.

If you don't have any Labels widget then add it by clicking ADD Page ELEMENT link in the Page. Then navigate to EDIT HTML subtab and Check EXPAND WIDGETS box.

Step 2 :

Now search for this Line.

<b:widget id='Label1' locked='false' title='Labels' type='Label'>

Now below this line , you will find this code


<b:loop values='data:labels' var='label'>
<li>
<b:if cond='data:blog.url == data:label.url'>
<data:label.name/>
<b:else/>
<a expr:href='data:label.url'><data:label.name/></a>
</b:if>
(<data:label.count/>)
</li>
</b:loop>


Now replace the above code with the following code.

<script type='text/javascript'>
var labelnum = 0;
<b:loop values='data:labels' var='label'>
if (<data:label.count/> &gt; 2) {
document.write(&quot;<li><a expr:href='data:label.url + "?max-results=5"'
rel='nofollow'><span><data:label.name/></span></a>(<data:label.count/>)</li>&quot;);
}
</b:loop>
</script>


It should look like this


Show only Labels with specific number of posts


In the above script edit the text in green to show Labels which contains more than text in Green.

for example : I have chosen number 2 , then Labels which contains more than 2 posts will be shown and other labels will be hidden.

Edit the text in red to show only specific number of posts in Labels Page.

That's it , you have successfully implemented the "Show Labels with specific number of Posts " hack in your blog.

If you have any problem , let me know.

Related Posts Widget For Blogger - Bugs fixed

Many of my readers are asking help to add Related Posts Widget . I was confused because i have added all the code correctly then why my friends are not getting this hack working. So i looked the templates of all those who sent me error message . All their templates are of same structure ( labels line is appearing below post , see the screenshot below)

 Related Posts Widget Bug

But the script i have included in the post is for those who have Label line below post title like this.

Related Posts Hack original format


Bloggers with the above format are not getting this related posts hack because the script loads earlier than the Labels line. We can fix this error in Three methods.

Method One :


Login to your blogger account and navigate to Layout section of the blog. Then go to edit HTML page and check expand widgets box.

Now search this line : <div class='post-header-line-1'/>

Now please copy and paste the code above that line.

<span class='meta'>

<b:if cond='data:post.labels'>
categories :
<b:loop values='data:post.labels' var='label'>
<a expr:href='data:label.url' rel='tag'><data:label.name/></a><b:if cond='data:label.isLast != &quot;true&quot;'>,</b:if><b:if cond='data:blog.pageType == &quot;item&quot;'>
<script expr:src='&quot;/feeds/posts/default/-/&quot; + data:label.name + &quot;?alt=json-in-script&amp;callback=related_results_labels&amp;max-results=10&quot;' type='text/javascript'/>
</b:if>
</b:loop>
</b:if>

<b:if cond='data:post.allowComments'>
<a class='comment-link' expr:href='data:post.addCommentUrl' expr:onclick='data:post.addCommentOnclick'><b:if cond='data:post.numComments == 1'> 1 <data:top.commentLabel/> &#187;<b:else/> <data:post.numComments/> <data:top.commentLabelPlural/> &#187;</b:if></a>

</b:if>


</span>


you can customize the text in red to display as many results you want.

Now add the below CSS code above ]]></b:skin>

.meta{float:left;width:480px;padding:3px; color:#111; font-size:12px; margin-bottom:8px; line-height:20px;border-bottom:1px dotted #cccccc;}
.meta a{color:#cc0000;}
.meta a:hover{color:#000000;}


Please edit the text in red to suit your template.

After this you need to add the CSS code and javascript i provided in this post " Related Posts Widget with custom CSS ".

Now add the script below this line <p><data:post.body/></p>

<b:if cond='data:blog.pageType == "item"'>
<div id="related-posts">
<h2>Other Recommended Posts</h2>


<script type='text/javascript'>
removeRelatedDuplicates(); printRelatedLabels(); </script><div style="display:none;"><a href="http://www.techieblogger.com">Techie Blogger</a></div>
</div></b:if>


Thats it , now you will have related posts widget in your blog.

Method 2 :


If you follow step one then you will have two meta lines in your Blog. One below post title and one below post content. If you are happy with first method then stop or else do these steps to add related posts hack. ( don't do both)

step 1 : First of all add the below code above </head>

<style>

#related-posts {
float : left;
width : 540px;
margin-top:20px;
margin-left : 5px;
margin-bottom:20px;
font : 11px Verdana;
margin-bottom:10px;
}
#related-posts .widget {
list-style-type : none;
margin : 5px 0 5px 0;
padding : 0;
}
#related-posts .widget h2, #related-posts h2 {
color : #940f04;
font-size : 20px;
font-weight : normal;
margin : 5px 7px 0;
padding : 0 0 5px;
}
#related-posts a {
color : #054474;
font-size : 11px;
text-decoration : none;
}
#related-posts a:hover {
color : #054474;
text-decoration : none;
}
#related-posts ul {
border : medium none;
margin : 10px;
padding : 0;
}
#related-posts ul li {
display : block;
background : url("http://i263.photobucket.com/albums/ii150/mohamedrias/newconcept_bullet.png") no-repeat 0 0;
margin : 0;
padding-top : 0;
padding-right : 0;
padding-bottom : 1px;
padding-left : 16px;
margin-bottom : 5px;
line-height : 2em;
border-bottom:1px dotted #cccccc;
}

</style>

<script type='text/javascript'>
//<![CDATA[
var relatedTitles = new Array();
var relatedTitlesNum = 0;
var relatedUrls = new Array();
function related_results_labels(json) {
for (var i = 0; i < json.feed.entry.length; i++) {
var entry = json.feed.entry[i];
relatedTitles[relatedTitlesNum] = entry.title.$t;
for (var k = 0; k < entry.link.length; k++) {
if (entry.link[k].rel == 'alternate') {
relatedUrls[relatedTitlesNum] = entry.link[k].href;
relatedTitlesNum++;
break;
}
}
}
}
function removeRelatedDuplicates() {
var tmp = new Array(0);
var tmp2 = new Array(0);
for(var i = 0; i < relatedUrls.length; i++) {
if(!contains(tmp, relatedUrls[i])) {
tmp.length += 1;
tmp[tmp.length - 1] = relatedUrls[i];
tmp2.length += 1;
tmp2[tmp2.length - 1] = relatedTitles[i];
}
}
relatedTitles = tmp2;
relatedUrls = tmp;
}
function contains(a, e) {
for(var j = 0; j < a.length; j++) if (a[j]==e) return true;
return false;
}
function printRelatedLabels() {
var r = Math.floor((relatedTitles.length - 1) * Math.random());
var i = 0;
document.write('<ul>');
while (i < relatedTitles.length && i < 20) {
document.write('<li><a href="' + relatedUrls[r] + '">' + relatedTitles[r] + '</a></li>');
if (r < relatedTitles.length - 1) {
r++;
} else {
r = 0;
}
i++;
}
document.write('</ul>');
}
//]]>
</script>


step 2 :
Now search this text

<b:loop values='data:post.labels' var='label'>
<a expr:href='data:label.url' rel='tag'><data:label.name/></a><b:if cond='data:label.isLast != &quot;true&quot;'>,</b:if>
</b:loop>

Now replace the above text with this code

<b:loop values='data:post.labels' var='label'>
<a expr:href='data:label.url' rel='tag'><data:label.name/></a><b:if cond='data:label.isLast != &quot;true&quot;'>,</b:if><b:if cond='data:blog.pageType == &quot;item&quot;'> <script expr:src='&quot;/feeds/posts/default/-/&quot; + data:label.name + &quot;?alt=json-in-script&amp;callback=related_results_labels&amp;max-results=5&quot;' type='text/javascript'/> </b:if> </b:loop>


Now scroll down still you can find ending tag for either </div> or </span> . Now paste the following script below the ending div / span tag.


<b:if cond='data:blog.pageType == "item"'>
<div id="related-posts">
<h2>Other Recommended Posts</h2>


<script type='text/javascript'>
removeRelatedDuplicates(); printRelatedLabels(); </script>

</div></b:if>

That's it now you will have related Posts hack in your blog.

Third Method :


In my Blog I am using this method . It's very simple. First do the step 1 from method 2 . ( adding script above
</head> ) .

Now add the following tag below <p><data:post.body/></p> .

<b:if cond='data:blog.pageType == "item"'>
<div id="related-posts">
<h2>Other Recommended Posts on<div style="display:none;"> <b:loop values='data:post.labels' var='label'><data:label.name/><b:if cond='data:label.isLast != &quot;true&quot;'>,</b:if><b:if cond='data:blog.pageType == &quot;item&quot;'>
<script expr:src='&quot;/feeds/posts/default/-/&quot; + data:label.name + &quot;?alt=json-in-script&amp;callback=related_results_labels&amp;max-results=5&quot;' type='text/javascript'/></b:if></b:loop>
</div> </h2>

<script type='text/javascript'>
removeRelatedDuplicates(); printRelatedLabels(); </script>

</div></b:if>

Now you will have related posts widget of my style.

I hope one of the above method will help you to add related posts widget to your Blog. Still if you have problem then please contact me through contact form.

Show only specific Number of posts in Labels Page - Blogger Hack

One of my Reader asked me in Comment Form " How to Show Specific Number of Posts in Labels Page ? " . So I am writing this Post on his request. This Hack ( Show Specific Number of Posts In Labels Page ) is very useful for Page Navigation Hack . Users who use my Page Navigation hack might have came across an error , that is When They visit Labels Page , Blogger will display all posts under that particular label although you might have mentioned in the page Navigation Widget to show only 2 , 3 or any number you specified there.


So here is an easy Hack to display only specific number of posts per page while visiting Labels. Just follow the simple steps below to implement this hack on your blogger blog.


Show Only Specific Number of Posts in Blogger Labels Pages


Step 1 :

Users Who Have installed Labels Widget in their Blog , Please Navigate to EDIT HTML PAGE . Then put a check to Expand Widgets Box on Right Side.

Now search for this Code :

<b:widget id='Label1' locked='false' title='Labels' type='Label'>

only the Widget Id can be different , other things will be same. Now search for this code within the widget

<a expr:dir='data:blog.languageDirection' expr:href='data:label.url'>
<data:label.name/>
</a>
</b:if>
<span dir='ltr'>(<data:label.count/>)</span>


Now replace the above code with this code .


<a expr:dir='data:blog.languageDirection' expr:href='data:label.url + &quot;?max-results=2&quot;'>
<data:label.name/>
<span dir='ltr'>(<data:label.count/>)</span>
</a>
</b:if>


The digit in red represents number of posts to be Shown in Single Labels Page.
Change the digit ( number ) in red to your wish .

You Can put same number you entered in Page Navigation Hack


That's it We have successfully added " Show Specific Number of Posts in Labels Page " . here after your Blog Will Show only specific number of posts in Labels Page. I hope This Hack will be useful for you all. If you have any doubts or difficulties in implementing this Hack please let me Know. I will clarify them in comment form or If neccessary I will write a New post like this.

thanks for reading.......

Redirect Users From Old Domain To New Domain - Blogger Hack

Hi Guys , Today I have come with the most Wanted hack named " Redirect Users From Old Domain To New Domain " . This Hack is very useful for Blogger Users , because in Blogger Bx-Errors may cause your Blogger Blog unavailable for longtime. As you all know my Blog is also met with an BX-error which made my Blog unavailable for 2 months. After waiting such a longtime I decided to create a new Blog with same Domain (rias-techno-wizard.blogspot.com ). But now guys I have found a simple Script through which we can redirect Old Blog users to Our New Blog. In this Post I will tell you How to Implement This Blogger Hack " Redirect Users to New Blog ".

 Redirect users from Old Domain To New Domain


Is this Hack Useful ?

Of course " Redirect users to New Blog Domain " hack is very useful for those who have changed their domains.

for example : I have a domain named rias-techno-wizard.blogspot.com . I wanted to change my domain to bloggeraccessories.blogspot.com or other domains related to my Blog content. But I am afraid ,will I get my old Blog users ( rias-techno-wizard.blogspot.com ) to my new Domain. So I decided to carry on with this Domain.
But Now my Domain has got Google Page Rank 3 sengihnampakgigi .

But Now I have a simple Javascript which redirects our Old Blog Users to Our New Blog.

How to Set-up this Hack ?

It's very Simple , just follow the steps below.

Login to your Blogger account and Go to Layout section of your Old Blog . Then navigate to EDIT HTML sub tab and search this text </head> .

Now Copy and paste the following Code Below or Above that line .

<script>
//<![CDATA[
alert('Sorry For the trouble guys , I have moved my Blog to http://rias-techno-wizard.blogspot.com . So you will be redirected to my New Blog in few seconds');

window.location.href = 'http://rias-techno-wizard.blogspot.com';
//]]>
</script>


The text in Green will appear in the Alert Box ( Edit it to your Wish ).

The Text in Red is the destination Url . ( place your new Blog Url )

You can Also place the above code , by adding a new HTML/JAVASCRIPT page Element .


Now When users go to your old Blog they Will get this Alert Message as shown below ,


 Redirect users from Old Domain To New Domain

and they will be redirected to your New Domain in a few seconds.

I hope you will like this Hack. if you Have any Problem let me know. I am here to help you .

thanks for reading , see you soon with a new hack.

Jquery Link Scrubber Hack for Blogger

Everyone would have noticed in their Blogs that whenever you click an Link a dotted border appear around the link. The dotted Border not only appears for links but for all images , Post Titles , etc. It's some what Annoying . After surfing internet for a while Now I have found a hack developed by Crismancich , which removes the dotted line onfocus from links.


What things We need ?


To Implement this Link Scrubber Hack we need to scripts namely ,

1. Jquery 1.2.2 .js

2. Link Scrubber Script

How to implement this Link Scrubber Blogger Hack ?


Go to Layout section of your Blog Template and then navigate to Edit HTML sub tab.

Now search for this code </head> and place the following code immediately above that line.


<script type="text/javascript" src="http://jqueryjs.googlecode.com/files/jquery-1.2.1.pack.js"></script>

<script type="text/javascript" src="http://www.crismancich.de/jquery/plugins/linkscrubber/jquery.linkscrubber.js"></script>


or


<script type="text/javascript" src="http://jqueryjs.googlecode.com/files/jquery-1.2.1.pack.js"></script>

<script> $(document).ready(function(){$("a").bind("focus",function(){if(this.blur)this.blur();});}); </script>


That's it We have successfully added Jquery Link Scrubber Hack for Blogger.

Jquery script must be above Link Scrubber Script


If you Have any doubt please ask me , I am here to help you .

See you soon with a new hack.

Add Yahoo Smileys to Blogger Posts - Firefox Hack

This Blogger Hack is focused Firefox Users who want to add Yahoo Smileys to Blogger Posts. This hack don't work for other browsers like Internet Explorer , Opera , etc . I kindly request other browser users to see this post " yahoo Smileys Hack "


Firefox users follow this simple steps to add Yahoo smileys to Blogger Posts :

Step 1 :

open Firefox browser and install " Grease monkey " by visiting Grease monkey Addon ! and restart browser .

step 2 :

After installing Grease Monkey , install this Javascript file ( just open th file , Grease monkey will install automatically ) .

step 3 : Go to Layout section of your blog and click Edit HTML subtab . Now add this CSS code above ]]></b:skin>

img.emoticon {
padding: 0;
margin: 0;
border: 0;
}


that's it we have successfully added yahoo Smileys to blogger. celebrate

See you soon with a new hack .

Display CSS codes and Scripts in unique Style - Blogger Post Styling hack

All of you might have noticed that in my blogger posts I use a custom CSS style to show CSS codes , Scripts and other important notes. After looking at this cool features one of my reader asked me how to do this. So I am Posting this " Post Styling Hack for blogger to display scripts and CSS codes in unique style " .

 Blogger Post Styling Hack


Just Follow This steps to add this " Post Styling Hack " to your Blog .

Step 1 :

Login to your Blogger account and navigate to Layout section . Then go to Edit Html subtab .

No Need to Check Expand Widgets Box


Step 2 : Add This CSS code above this line ]]></b:skin> .


.codeview {
margin : 15px 35px 15px 15px;
padding : 10px;
clear : both;
list-style-type : none;
background : #f9f9f9 url(http://i263.photobucket.com/albums/ii150/mohamedrias/cv-1.gif) no-repeat right bottom;
border-top : 1px solid #eeeeee;
border-right : 2px solid #cccccc;
border-bottom : 2px solid #cccccc;
border-left : 1px solid #eeeeee;
}
.codeview li {
font-size : 13px;
line-height : 24px;
font-family : "Courier New", "MS Sans Serif", sans-serif, serif;
color : #333333;
font-weight : normal;
margin : 0;
padding : 0;
}


See Screenshot Below for Instructions :

Blogger Post Styling Hack


you can change the text in red to your wish to suit your Template.


Step 3 :

Whenever you create new posts just include the speical Script ( CSS code , Scripts , etc ) within this div section .

<div class="codeview">

Insert the Special code here

</div>

Don't use id instead of class


that's it you have add this post Styling hack to your blogger template celebrate .

 Blogger Post Styling Hack


See you soon with a new hack . please tell your suggestions to this post. It will help me to improve the standard of this hack.

Page Navigation Hack for Blogger

Most said page navigation menu in the bottom of the page can appear only in Wordpress blogs. But Now here is a blogger hack which will help you to show Page Navigation Menu in bottom of the page ( see screenshot ) . you can Add this Page Navigation hack to your blogger template either by inserting script to your template by editing or you can add it as a widget . In this post I will write only how to add this Page navigation menu by editing template code.

Page Navigation Hack


I have used a background image for this Page Navigation hack. If you want to show this without the background image just remove the background image url .

Let us start :

Step 1 : Log in to your blogger account and navigate to Layout section. Now go to the edit HTML subtab.

Step 2 : search this line ]]></b:skin> and add this CSS code above that line.


CSS CODE WITH IMAGE :


.showpageArea {padding: 0 2px;margin-bottom:10px;margin-top:10px;
}

.showpageArea a {border: 1px solid #505050;
color: #000000;font-weight:normal;
padding: 3px 6px !important;
padding: 1px 4px ;margin:0px 4px;
text-decoration: none;
}
.showpageArea a:hover {
font-size:11px;
border: 1px solid #333;
color: #000000;
background-color: #FFFFFF;
}

.showpageNum a {border: 1px solid #505050;
color: #000000;font-weight:normal;
padding: 3px 6px !important;
padding: 1px 4px ;margin:0px 4px;
text-decoration: none;

}
.showpageNum a:hover {
font-size:11px;
border: 1px solid #333;
color: #000000;
background-color: #FFFFFF;

}
.showpagePoint {font-size:11px;
padding: 2px 4px 2px 4px;
margin: 2px;
font-weight: bold;
border: 1px solid #333;
color: #fff;
background-color: #000000;


}

.showpage a:hover {font-size:11px;
border: 1px solid #333;
color: #000000;
background-color: #FFFFFF;

}
.showpageNum a:link,.showpage a:link {
font-size:11px;
padding: 2px 4px 2px 4px;
margin: 2px;
text-decoration: none;
border: 1px solid #0066cc;
color: #0066cc;
background-color: #FFFFFF;}

.showpageNum a:hover {font-size:11px;
border: 1px solid #333;
color: #000000;
background-color: #FFFFFF;
}


It must look like this :

 When you Add CSS code to your template , it must look like this


Step 3 : Now search for this code or related in your template ( no need to expand widgets )

<b:section class='main' id='main' showaddelement='yes'>
<b:widget id='Blog1' locked='true' title='Blog Posts' type='Blog'/>
</b:section>


Now Add This script just below the </b:section> .


&lt;script type=&quot;text/javascript&quot;&gt;

function showpageCount(json) {
var thisUrl = location.href;
var htmlMap = new Array();
var isFirstPage = thisUrl.substring(thisUrl.length-14,thisUrl.length)==&quot;.blogspot.com/&quot;;
var isLablePage = thisUrl.indexOf(&quot;/search/label/&quot;)!=-1;
var isPage = thisUrl.indexOf(&quot;/search?updated&quot;)!=-1;
var thisLable = isLablePage ? thisUrl.substr(thisUrl.indexOf(&quot;/search/label/&quot;)+14,thisUrl.length) : &quot;&quot;;
thisLable = thisLable.indexOf(&quot;?&quot;)!=-1 ? thisLable.substr(0,thisLable.indexOf(&quot;?&quot;)) : thisLable;
var thisNum = 1;
var postNum=1;
var itemCount = 0;
var fFlag = 0;
var eFlag = 0;
var html= &#39;&#39;;
var upPageHtml =&#39;&#39;;
var downPageHtml =&#39;&#39;;


var pageCount=5;
var displayPageNum=3;
var firstPageWord = &#39;First&#39;;
var endPageWord = &#39;Last&#39;;
var upPageWord =&#39;Previous&#39;;
var downPageWord =&#39;Next&#39;;


var labelHtml = &#39;&lt;span class=&quot;showpageNum&quot;&gt;&lt;a href=&quot;/search/label/&#39;+thisLable+&#39;?&amp;max-results=&#39;+pageCount+&#39;&quot;&gt;&#39;;

for(var i=0, post; post = json.feed.entry[i]; i++) {
var timestamp = post.published.$t.substr(0,10);
var title = post.title.$t;
if(isLablePage){
if(title!=&#39;&#39;){
if(post.category){
for(var c=0, post_category; post_category = post.category[c]; c++) {
if(encodeURIComponent(post_category.term)==thisLable){
if(itemCount==0 (itemCount % pageCount ==(pageCount-1))){
if(thisUrl.indexOf(timestamp)!=-1 ){
thisNum = postNum;
}

postNum++;
htmlMap[htmlMap.length] = &#39;/search/label/&#39;+thisLable+&#39;?updated-max=&#39;+timestamp+&#39;T00%3A00%3A00%2B08%3A00&amp;max-results=&#39;+pageCount;
}
}
}
}//end if(post.category){

itemCount++;
}

}else{
if(title!=&#39;&#39;){
if(itemCount==0 (itemCount % pageCount ==(pageCount-1))){
if(thisUrl.indexOf(timestamp)!=-1 ){
thisNum = postNum;
}

if(title!=&#39;&#39;) postNum++;
htmlMap[htmlMap.length] = &#39;/search?updated-max=&#39;+timestamp+&#39;T00%3A00%3A00%2B08%3A00&amp;max-results=&#39;+pageCount;
}
}
itemCount++;
}
}

for(var p =0;p&lt; htmlMap.length;p++){
if(p&gt;=(thisNum-displayPageNum-1) &amp;&amp; p&lt;(thisNum+displayPageNum)){
if(fFlag ==0 &amp;&amp; p == thisNum-2){
if(thisNum==2){
if(isLablePage){
upPageHtml = labelHtml + upPageWord +&#39;&lt;/a&gt;&lt;/span&gt;&#39;;
}else{
upPageHtml = &#39;&lt;span class=&quot;showpage&quot;&gt;&lt;a href=&quot;/&quot;&gt;&#39;+ upPageWord +&#39;&lt;/a&gt;&lt;/span&gt;&#39;;
}
}else{
upPageHtml = &#39;&lt;span class=&quot;showpage&quot;&gt;&lt;a href=&quot;&#39;+htmlMap[p]+&#39;&quot;&gt;&#39;+ upPageWord +&#39;&lt;/a&gt;&lt;/span&gt;&#39;;
}

fFlag++;
}

if(p==(thisNum-1)){
html += &#39;&amp;nbsp;&lt;span class=&quot;showpagePoint&quot;&gt;&lt;u&gt;&#39;+thisNum+&#39;&lt;/u&gt;&lt;/span&gt;&#39;;
}else{
if(p==0){
if(isLablePage){
html = labelHtml+&#39;1&lt;/a&gt;&lt;/span&gt;&#39;;
}else{
html += &#39;&lt;span class=&quot;showpageNum&quot;&gt;&lt;a href=&quot;/&quot;&gt;1&lt;/a&gt;&lt;/span&gt;&#39;;
}
}else{
html += &#39;&lt;span class=&quot;showpageNum&quot;&gt;&lt;a href=&quot;&#39;+htmlMap[p]+&#39;&quot;&gt;&#39;+ (p+1) +&#39; &lt;/a&gt;&lt;/span&gt;&#39;;
}
}

if(eFlag ==0 &amp;&amp; p == thisNum){
downPageHtml = &#39;&lt;span class=&quot;showpage&quot;&gt; &lt;a href=&quot;&#39;+htmlMap[p]+&#39;&quot;&gt;&#39;+ downPageWord +&#39;&lt;/a&gt;&lt;/span&gt;&#39;;
eFlag++;
}
}//end if(p&gt;=(thisNum-displayPageNum-1) &amp;&amp; p&lt;(thisNum+displayPageNum)){
}//end for(var p =0;p&lt; htmlMap.length;p++){

if(thisNum&gt;1){
if(!isLablePage){
html = &#39;&lt;span class=&quot;showpage&quot;&gt;&lt;a href=&quot;/&quot;&gt;&#39;+ firstPageWord +&#39; &lt;/a&gt;&lt;/span&gt;&#39;+upPageHtml+&#39; &#39;+html +&#39; &#39;;
}else{
html = &#39;&#39;+labelHtml + firstPageWord +&#39; &lt;/a&gt;&lt;/span&gt;&#39;+upPageHtml+&#39; &#39;+html +&#39; &#39;;
}
}

html = &#39;&lt;div class=&quot;showpageArea&quot;&gt;&lt;span style=&quot;font-size:11px;padding: 2px 4px 2px 4px;margin: 2px 2px 2px 2px;color: #000000;border: 1px solid #333; background-color: #FFFFFF;&quot; class=&quot;showpage&quot;&gt;Page &#39;+thisNum+&#39; of &#39;+(postNum-1)+&#39;: &lt;/span&gt;&#39;+html;

if(thisNum&lt;(postNum-1)){
html += downPageHtml;
html += &#39;&lt;span class=&quot;showpage&quot;&gt;&lt;a href=&quot;&#39;+htmlMap[htmlMap.length-1]+&#39;&quot;&gt; &#39;+endPageWord+&#39;&lt;/a&gt;&lt;/span&gt;&#39;;
}

if(postNum==1) postNum++;
html += &#39;&lt;/div&gt;&#39;;

if(isPage isFirstPage isLablePage){
var pageArea = document.getElementsByName(&quot;pageArea&quot;);
var blogPager = document.getElementById(&quot;blog-pager&quot;);

if(postNum &lt;= 2){
html =&#39;&#39;;
}

for(var p =0;p&lt; pageArea.length;p++){
pageArea[p].innerHTML = html;
}

if(pageArea&amp;&amp;pageArea.length&gt;0){
html =&#39;&#39;;
}

if(blogPager){
blogPager.innerHTML = html;
}
}

}
&lt;/script&gt;

&lt;script src=&quot;/feeds/posts/summary?alt=json-in-script&amp;callback=showpageCount&amp;max-results=99999&quot; type=&quot;text/javascript&quot;&gt;&lt;/script&gt;


<div style='text-align:right;font-size:10px;color:000000;margin-top:15px;display:none;'> <a href='http://www.techieblogger.com/2008/07/page-navigation-hack-for-blogger.html'>Grab this Widget ~ Techie Blogger</a></div>


In the code above you can edit the lines in red to your wish .

1 : var pageCount = 5;

The digit in red represents number of posts to be shown in single page. Change the digit to show as many pages you want.

for example :

In my blog I have put that value as 2 . In each page you can see only 2 posts .


2 : var displayPageNum = 3;

here the digit in red represents number of pages to be listed.

For example :

In my blog I have chosen 3 , then 3 pages will be shown.

That's it now we have added Page Navigation menu hack to our blog successfully .

That CSS code will suit almost all templates. Please don't remove the credit link.

I hope all of you will like this Page Navigation blogger hack . If you have any doubts please ask in comment section . Comments are most welcome , please give me your feedback about this blogger Hack.

You can also add this Page navigation hack in the another method : Widget style.

Colorful Link Hover Hack for Blogger

Today I have come with a really interesting and cool hack . This Hack is about changing Link Hover color with a simple Script. In all Blogs or website you can see only one Link Hover Color. But Here is cool javascript to add more colors to links. Here After I will add blogger hacks to my blog so that you guys can have an idea about that hack.


I Have added this Colorful Link Hover Blogger Hack to my Blog , you can check this hack by hovering your mouse cursor through links.

Colorful Link Hover Hack


In the Image above you can see that a single link is showing nearly 10 colors on Mouse Hover.

How to Add this Colorful Link Hover hack to my Blog ?

Its really very easy . Now Let us see how to add this Colorful Link Hover Hack in Blogger.

First login to your Blog and Navigate to Layout section . There click Edit HTML subtab .

Now search this following code </head> and add the below Javascript above the head section. If you Have any doubt please refer Image below .

<script src='http://rias.techno.wizard.googlepages.com/rainbow2.js'/>


ColorFull Link Hover - Blogger hack


That's it we have successfully Added colorful Link Hover Hack to Blogger celebrate.

Troubleshooting :

Sometime you may not see this hack because my Google page account bandwidth may be exceeded . Please upload the javascript to your own google page account.

Featured Post :

Tomorrow I am going to write about Adding Page Navigation Hack , don't forget to subscribe. Only few blogger blogs have this feature (Mine is also one among them sengihnampakgigi).

Thanks for reading , see you tomorrowbabai.

Add Search form to Blogger Beta Template

At first Adding search form to blogger was difficult but now Blogger Accessories has made it easier. We can add search form to blogger in three method . But in this post I am going to concentrate only on Adding custom search form . Custom search form means you can modify the search form look by adding simple CSS style.


  this is the screenshot of  Search Form Widget


Step 1 : Log in to your blogger template and go to Layout section .


 Adding search Form Widget to Blogger Beta : Layout Image
  

Step 2 : Now click Add Page Element , in the List select Add HTML / JAVASCRIPT  and paste the below code thereand save .


<form id="searchThis" action="/search" style="display:inline;" method="get"><input id="searchBox" name="q" type="text"/> <input id="searchButton" value="Go" type="submit"/></form>


Now see your blog , there you can see a beautiful search form widget like this ,


I hope you like this hack . you can also add custom search submit buttom , background , etc.


I will tell you How to add Custom CSS to this search Form tomorrow in my next post .

How to change Blogger Template without deleting widgets ?

One of the Major Problem Blogger users have is whenever they try to change their templates , They will loss their widgets even if they take backup of their template. After Changing their template , they need to add widgets again manually. It's really annoying and time consuming process.

Is there any way to Backup our Widgets ?

yes . We can backup our widgets before changing our template.


How to backup Blogger Widgets ?

It's really simple guys , before changing template search your widgets code without putting check in expand widgets box.

Select the widget code as shown in the image below.


Now save the widget codes shown in between yellow box to notepad. Copy and Paste all your widget codes.

After doing this Upload your New Template . After uploading you will get a message like this


At This stage don't click Confirm & save tab. Rather search for the following code <b:widget id=' , Now paste the widget codes you have saved immediately above or below the code in yellow

After adding the widget codes save your template.
That's it ! Now you will have all widgets that you used in your previous blogger template.

How This works ?

Blogger will keep the widget content on their database with unique widget id.

I hope this hack will be very useful to you guys. Tell me your suggestions in our comment form , If you have any doubts ask there I will help you.

Add Icon Before Post Titles

Today I am going to tell how to add Icons to post titles. You would have noticed in some wordpress blogs like Dezzain and other famous blogs using Icons before the Post titles. Never Wonder how to do or Whether only Wordpress has this feature. It's really an easy hack and I will help you to implement this.


Let us start :

Step 1 :

First you need to create an image / Icon which you would like to show before each post title. You can create the image either in Photoshop or in Online Image creators. After creating the image upload it to blogger or any other image hosting sites like imageasck.us , photobucket , etc . Now copy and paste the image url in a text file.

Step 2 :

You need to create simple HTML code for your image like below ,

<img src=" your Image Url " />

change the text in red with your image url. Now we have successfully created the code for our image.

Step 3 :

Now let us see how to implement the image code in blogger Template. Login to your Blogger Account , then go to Layout subtab and then to EDIT HTML tab. Before we start first take a backup of your template . Put a check in expand widgets box and search for the code in red .

<b:if cond='data:post.url'>

<a expr:href='data:post.url'><data:post.title/></a>

If you want to show the image before post title , you need to add the image code after the red line.

If you want the image to appear after post title then paste the image code after the green text.

After doing this preview your template , Then save it.

I hope you would have liked this hack. If you have any problems in implementing this hack ask in comment form I will help you.

Tomorrow I will come with another nice Blogger Hack , If you don't want to miss it then subscribe to our RSS feed.

Embed Comment Form below post in Blogger

One of the problem blogger have is that Blogger don't have a embedded comment form like wordpress. After a longtime , now blogger draft has found a trick to include comment form. It's really an easy hack for those who use templates provided by blogger. For those who use customized template need to include a HTML code to make the comment form appear below each post.

Let see how to do this :

Step 1 : First login to draft.blogger.com with your google account . Then in blogger dashboard click settings then comments. There you will find three options like this

As shown above check comment form placement : Embedded below post.

Step 1 is enough for users who use uncustomized blogger template. For them after doing this the comment form will be included below the post. Other users need to do the second step to make the comment form appear below post.

Step 2 :

Now go to Edit HTML section and first take a backup copy of your template. Then check expand widgets and search the folowing code


<p class='comment-footer'> <b:if cond='data:post.allowComments'> <a expr:href='data:post.addCommentUrl' expr:onclick='data:post.addCommentOnclick'><data:postCommentMsg/></a> </b:if> </p>


Now replace the above code with this following code


<p class='comment-footer'> <b:if cond='data:post.embedCommentForm'> <b:include data='post' name='comment-form'/> <b:else/> <b:if cond='data:post.allowComments'> <a expr:href='data:post.addCommentUrl' expr:onclick='data:post.addCommentOnclick'><data:postCommentMsg/></a> </b:if> </b:if> </p>


that's it save your template. Now you can see a beautiful comment form embedded below each post.

Screenshot :


Troubleshooting :

Do this step only if the comment form don't appear after step 2. In some templates even after adding this code the comment form will not appear. Thanks to Blogger Buster for this hack . Now search for <b:include data='post' name='comments' /> and add the following code immediately below it <b:include data='post' name='comment-form'/> .

After adding this code all templates will have comment form embedded below post . It's really one of the best hack which draft blogger has now made it available for all blogger users. Before this most visitors might have felt uneasy to comment , because to write comments we need to navigate from the page or a pop-up window will open . But now writing comments is made very easy.

Anything else we can do with the comment form ?

Yes , we can change the width and height of comment form .

to change the width and height of comment form just change the following code in green .


<b:includable id='comment-form' var='post'>
<div class='comment-form'>
<a name='comment-form'/>
<h3><data:postCommentMsg/></h3>
<p><data:blogCommentMessage/></p>
<iframe allowtransparency='true' expr:src='data:post.commentFormIframeSrc' frameborder='0' height='275' id='comment-editor' scrolling='auto' width='100%'/>
</div>
</b:includable>


Why are you waiting for , write a comment on this post and let me know how much you liked this post .

Show Date before each Post in Blogger

You might have noticed in my template that there is a date widget before each post. Only a very few templates will have this. I hope to have a best and beautiful template we must concentrate in all minute things. So I decided to help my visitors to implement this hack in their template too. In this post I will give you the code what i have in my template , you guys can customize it to suit your template. If you have any doubts ask me in comment section .

Let' s start :


Go to settings then Formatting and change the date header format and other things similar to this you find in the image below


After doing this save your settings . Now navigate to edit HTML section and check exchange widgets , Then add the following CSS code in the CSS section of your template


#fecha {
display:block;
text-align: center;
float:left;height:70px;
font-family: Arial, Helvetica, sans-serif;
width:70px;
margin:0px 5px 0 0;
background:url(http://i263.photobucket.com/albums/ii150/mohamedrias/post-top_bg.png);
}

.fecha_dia {
display:block;
font-size:1.2em;
margin:0;
color:#336699;
font-weight: bold;
padding:0.7em 0 1.1em 0;
text-align: center;
}

.fecha_mes {
display:block;
font-size: 0.9em;
margin:0;
padding-top:5px;
color:#A10000;
font-weight: bold;
text-align:center;
}

.fecha_ano { display:none; visibility:hidden; height:0; }


.post-title, .post-title a {
margin-bottom:20px; padding:2px 0 0 0;
color:#00335B;text-decoration:none;
}
.post-title a hover {color:#00335B;text-decoration:none}
.post h2 {
font-family: Arial, Georgia, Sans-serif;
font-size: 18px;
margin-bottom:20px;
text-align:left;color:#00335B;
text-transform:uppercase;
}

.post-body {
font-family: Verdana, Arial, Georgia, Sans-serif;
font-size: 13px;margin-bottom:20px;margin-left:170px;
line-height: 1.3em;
margin: 3px 0 5px 0;
}


.post_header {
margin:0; padding:0;
height:90px;

}

.post_headerr {
margin-bottom:20px; padding:0;
}


.post-labels {
background:url(http://i263.photobucket.com/albums/ii150/mohamedrias/category-1.gif) no-repeat;
margin:0; padding:0 0 0 20px;
}

.details .post-comment-link {
background:url(http://i263.photobucket.com/albums/ii150/mohamedrias/comments-1.gif) no-repeat;
margin:0; padding:0 0 0 20px;
}


and now search for this following code <div class='post uncustomized-post-template'> or similar and then select the code below that line upto <div class='post-body'>
and replace that code with the following code


<div class='post_header'>
<div id='fecha'>
<script>remplaza_fecha(&#39;<data:post.timestamp/>&#39;);</script>
</div>

<div class='post_headerr'>

<a expr:name='data:post.id'/>
<b:if cond='data:post.title'>
<h2 class='post-title entry-title'>
<b:if cond='data:post.link'>
<a expr:href='data:post.link'><data:post.title/></a>
<b:else/>
<b:if cond='data:post.url'>
<a expr:href='data:post.url'><data:post.title/></a>
<b:else/>
<data:post.title/>
</b:if>
</b:if>
</h2>
</b:if>

<div class='details'>
<span class='post-labels'>
<b:if cond='data:post.labels'>
<data:postLabelsLabel/>
<b:loop values='data:post.labels' var='label'>
<a expr:href='data:label.url' rel='tag'><data:label.name/></a><b:if cond='data:label.isLast != &quot;true&quot;'>,</b:if><b:if cond='data:blog.pageType == &quot;item&quot;'>
<script expr:src='&quot;/feeds/posts/default/-/&quot; + data:label.name + &quot;?alt=json-in-script&amp;callback=related_results_labels&amp;max-results=10&quot;' type='text/javascript'/>
</b:if>
</b:loop>
</b:if>
</span> |
<span class='post-comment-link'>
<b:if cond='data:blog.pageType != &quot;item&quot;'>

<b:if cond='data:post.allowComments'>
<a class='comment-link' expr:href='data:post.addCommentUrl' expr:onclick='data:post.addCommentOnclick'><b:if cond='data:post.numComments == 1'>1 <data:top.commentLabel/><b:else/><data:post.numComments/> <data:top.commentLabelPlural/></b:if></a>
</b:if>
</b:if>
</span>

</div>
</div>
</div> <div class='post-header-line-1'/>


Now you can see date before each post.

Screenshot :


Anything else you can do with this ?

yes, In the CSS code you can see some codes are in red . You can change the codes in red to suit your template .

Write comments about this post and give me your suggestions .

Custom Search
Web Analytics