Converting Wordpress themes to Blogger Templates

It's being longtime I have ripped a Wordpress theme to use in Blogger Beta. Many users ask me for wordpress theme conversion in Google talk. I thought it would be great to open a thread in Techie blogger itself , so that all my readers can give me suggestions. I can rip any existing wordpress theme to blogger template or I can customize your existing Blogger template.


Some Blogger use to demand money to rip wordpress themes to blogger templates , But I am going to do this for free. So No need to pay 10$ for any site to get your desired wordpress theme to use in Blogger. You can request conversion of any wordpress theme here via comments. If more users recommend the same theme or if I feel it to be a professional one, I will rip that wordpress theme to Blogger Beta Template.

Customizing Blogger Templates

If you have any errors in Blogger templates , then you can contact me via gtalk. I can help you to fix errors online itself.

You can contact me via Google Talk for any of these services :

  1. Ripping Wordpress themes to Blogger templates

  2. Fixing errors in Blogger Templates

  3. Making your CSS code compatible for all browsers

  4. Fixing XML or CSS errors

  5. SEO tips

Show Adsense ads below post title

In this tutorial I will explain how to place Adsense ads below post title in Blogger Blogs with lots of customization tips. You might have noticed that most of the bloggers show Google adsense ads below title to increase their Click through rate and earnings.

According to Google adsense help pages " Where to place adsense ads ?". Placing adsense ads below title and above article content can bring high ctr and performance.

Adsense ads Below post title

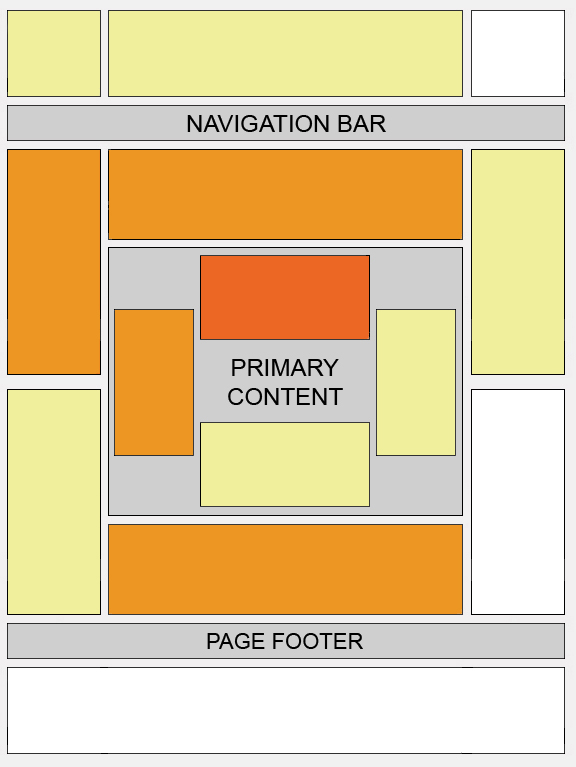
This "heat map" illustrates the ideal placing on a sample page layout. The colors fade from dark orange (strongest performance) to light yellow (weakest performance). So it's clear from the heat map that the adsense ads below post title can bring high ctr.

How to add Adsense ads below post title ?

It's really very easy to add adsense ads below post title in blogger. Inorder to add adsense ads below post title ,just follow the below steps.

Before adding the adsense ads to blogger templates , we need to encode our adsense ads code.If you add the adsense code without encoding then you can't see any adsense ads below post title.

Encoding Adsense Ad Code ?

To encode adsense ads, first create an adsense ad and then visit centricle website to encode. In centricle web page , you need to paste your adsense code in the text area and then click " Encode ". Copy the encoded code. Now your adsense code is ready to be added to blogger template.

Adding adsense ad code to blogger template

step 1 : Go to layout section of your blogger template and then navigate to EDIT HTML sub tab. There check the "Expand Widget Templates ".

step2 : Look up the following tag : <p><data:post.body/></p> and paste the encoded adsense ad code above that tag.

Then click save. That's it Now we have added the adsense ad code below the post title in blogger blog successfully.

Customizing Adsense ads

Here are the few customization tips , which you can apply to increase your CTR.You might have seen that most of the bloggers will show more than Three posts in home page / labels page / archives page. But as per adsense TOS we can show only Three ads per page. So due to this we will see some blank spaces between post title and content , when the three adsense ads are already loaded.In order to avoid this error , we can show adsense ads only in Post pages i.e pages containing articles.

Showing adsense Ad only in Post pages

In order to implement this hack in your blogger template. you need to change the encoded adsense ad code to this.


<b:if cond='data:blog.pageType == &quot;item&quot;'>
Encoded Adsense code here
</b:if>


Now paste this code above <p><data:post.body/></p>

Making adsense ads to Float

After adding the adsense ad code to your templates , you can see that by default the adsense ad code will not allow any text to be shown nearby it.


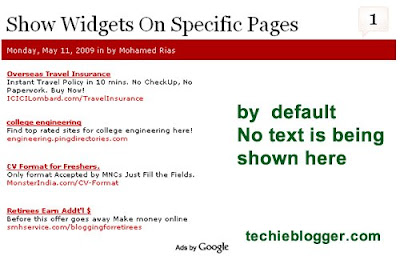
So in order to overcome this error , we need to add some CSS codes to make adsense ad code to float either left or right.

For this we just need to modify the encoded adsense code to be added in step 2.

replace that encoded code with this one :

<div style="float:left;padding:5px;">

encoded adsense ad code here

</div>


Change the text in red to make adsense ad to float either to left or right.

My suggestion


According to me , instead of showing adsense ads in all pages ( home page , archives page and labels page ) , we can show adsense ads only in post pages to increase our ctr. If you are using the " Read More hack for Blogger with automatic Thumbnail creator script " then it's advisable to show adsense ads only in post pages.

Hope you guys will like this hack. If you need any more customization , then give me your suggestions via comments.

backup Blogger Blog Widgets - an easy video tutorial

One of the Major Problem Blogger users have is whenever they try to change their templates , They will loss their widgets even if they have taken backup of their blogger blog template. After changing their Blogger template , they need to add blogger widgets again manually. It's really annoying and time consuming process. So here I have created a video which will give you step by step instructions to backup blogger templates without loosing any of your widgets.

Backup Blogger Widgets

I have written a tutorial on Backup Blogger blog widgets " How to change Blogger Template without deleting widgets ? " .But most of the friends found that difficult to backup blogger widgets. So in order to help them , I have created a video tutorial for them to backup Blogger Template and blogger widgets while changing their blogger templates.

BACKUP BLOGGER WIDGETS VIDEO TUTORIAL


This is my first video tutorial guys , so please give me your suggestions. Due to lesser RAM , the Voice is a bit choppy. If you still have any doubts or difficulty to backup the blogger blog widgets then please feel free to contact me.

Very soon I will write tutorials on
  • How to backup Blogger Posts
and will explain the functionality of numerous blogger posts backup software. If you don't want to miss my future tutorials or hack then please suscribe to my blog.

Read More hack for Blogger with automatic Thumbnail creator script

You might have noticed that since few weeks I have been using a strange script which enables us to summarize content and show only the summary with a thumbnail in Home Page , Archives page and Labels page.

Since some of my readers requested this hack in gtalk , so I am going to explain How to add this hack to your blogger template.


Before going into this , I would like to mention the previous versions of this created by some of my fellow Bloggers.


But these versions had some disadvantages like :

1. It can't automatically create summaries.


We need to add the following tag in all post pages while writing new posts

Type your summary here
<span id="fullpost">
Type rest of the post here
</span>


2. This feature can be available only for future posts.

That is if you already have 50 posts in your blog and then after that you are adding this hack to your template then you need to add the above tag in each and every previous 50 posts to make this hack working. But it's a tedious process.

3. Can't create Thumbnails automatically


This hack can't create automatic thumbnails for posts.

Now a new version has been developed by my blogger friends. I would like to share that new version of read more hack with you all.

Read More hack with automatic Thumbnail creator script


This hack has overcome all the drawbacks of the previous version of read more hack. This hack is developed by Blogsphera . ( Translated version ).

Let's see the installation instructions :

Adding the Javascript in the header

To add the javascript files to the header , first login to your blogger account. Then navigate to Layout section of your blog and then move to EDIT HTML sub tab.

There search for this tag : </head>

Now place the follwing code above that tag </head> :

<SCRIPT type='text/javascript'> var thumbnail_mode = &quot;no-float&quot; ; summary_noimg = 500; summary_img = 400; img_thumb_height = 130; img_thumb_width = 281; </SCRIPT> <SCRIPT src='http://www.smashingtips.com/wp-content/uploads/2009/05/read-more.js' type='text/javascript'/>


then save your template.

Final step : ADD the code in post body

Now check " Expand Widget Templates " option in the edit html page. And then search for this tag

<p><data:post.body/></p>


Now replace that whole tag with the code below :

<b:if cond='data:blog.pageType == &quot;item&quot;'>
<p><data:post.body/></p>
<b:else/><DIV expr:id='&quot;summary&quot; + data:post.id'><p><data:post.body/></p></DIV> <SCRIPT type='text/javascript'>createSummaryAndThumb(&quot;summary<data:post.id/>&quot;);</SCRIPT> <div style='clear: both;'/> <div style='border:0px;padding-top:5px;;float:right;text-align:right;'><span class='readon'><a expr:href='data:post.url' rel='bookmark'><img src='http://i422.photobucket.com/albums/pp302/bloggeracs/ReadMore.png'/></a></span></div>
</b:if>


You can now preview your template and then save it.

it will look like this :


Customizing The code

Now let us see how to customize the code to suit your style :

  • var thumbnail_mode = "no-float";
  • By default i have selected no-float. That the image will be unformatted. If you want the thumbnail to be shown only on left use the option " float " instead of "no-float".
  • summary_noimg = 500 ;
  • This code will decide how much characters must be shown in the post if that post doesn't contain any images. I have selected 500 characters.. you can customize it to suit ur template.
  • summary_img = 400 ;

  • If the post contains image , then this code will decide how many characters must be shown in that post. Change the number of characters to be shown to suit your template.
  • img_thumb_height = 130;
  • This tag decides the height of the thumbnail to be shown in the post. Vary the number 130 to suit your template.
  • img_thumb_width = 281 ;
  • This tag decides the width of the Thumbnail image to be shown.

    Adding read more image

    The author of this hack haven't included any read more buttons in this hack. But I have modified the code and have included a image to link to the full post.


    http://i422.photobucket.com/albums/pp302/bloggeracs/ReadMore.png

    If you want to change the image then replace the url of the image with your own image

    or if you don't need any read more button , then replace the code in final step to this one :

    <b:if cond='data:blog.pageType == "item"'>
    <p><data:post.body/></p>
    <b:else/><DIV expr:id='"summary" + data:post.id'><p><data:post.body/></p></DIV> <SCRIPT type='text/javascript'>createSummaryAndThumb("summary<data:post.id/>");</SCRIPT> <div style='clear: both;'/><div style='border:0px;padding-top:5px;;float:right;text-align:right;'><span class='readon'><a expr:href='data:post.url' rel='bookmark'>Read More...</a></span></div>
    </b:if>

    change the tag in red to suit your style.


Hope I have explained everything in this script. if you need any other modification or help please feel free to add to gtalk. I love to help you guys.

Custom Search
Web Analytics